Showing posts with label 2024. Show all posts

Sunday, 2 March 2025

Knitting Doll 2024 Part 6

Knitting Doll 2024 Part 6

Hurray. All the difficult bits have been done.

Slide on Arm


After creating the Slip Knot Slide it on one Arm of a Pair of Glasses. This can be done straight away after finishing the Slip Knot. Or alternatively you can make the Slip Knot on the other end of the Cord first.

Sew In Place


Slide the Knot to the Far End near the Lenses. Once happy with wear it is thread the Tail and Begin to Sew it in Place. Repeat with the other end of the Cord on the other Arm and Trim off any Excess.

Glasses Chain.


Voila!. The Corded Chain can now be used. Even though Sewn in Place it can be Slipped off and used on other Glasses like Sunglasses.

I have returned my Knitting Doll back to the Charity Shop so someone else can have a go. 

I have decided that although it has its use it is far better off with somebody with smaller fingers like a Child. Also I can Knit an I-Cord far easier or even braid one with my Lucet.

Saturday, 22 February 2025

Knitting Doll 2024 Part 5

 Knitting Doll 2024 Part 5

Have to confess I am not looking forward to writing this Blog. It is trying to split down a task that I do automatically and then stop at try and photograph whilst holding it. If all else fails google Slip Knots.

Pinch Loop


Taking one Tail End I am going to make a Slip Knot. However in order to show you I am having to make it Higher up. Therefore afterwards I will redo it at the correct point.

First form a Loop with the Tail End and Pinch it between Finger and Thumb. After that I Wrapped the Yarn around the Back of the Loop and brought the Tail around. See Photograph.

Double Wrap


I am Creating a Double Loop though it is not strictly necessary. It is helping me keep it in place whilst photographing.

Lift Bottom Loop


Lift the Bottom Loop using either your Finger of a needle. I recommend the Latter. Don’t Catch part of the Yarn like I have done.

Push Through Top


Push the Loop you Have through the Top one.

Pull and Slide


Then pull this Loop firmly then Slide up. This one was made deliberately High up for photographing purposes.

Loop at End


I have redone the Slip Knot. I started it nearer the End of the Cord so I could Slip it into its Correct Position at the End of the Cord.

The Major Problem I found doing this is that normally I do it at speed and often using a knitting Needle. Since doing this I found a Youtube video with a great description.

https://www.youtube.com/watch?v=oj21JDDSrgM

Here are some more methods of making a Slip Knot

https://www.youtube.com/watch?v=P4yMvLONsY0

These describe various methods. Not one of which was the one I was taught lol.

Sunday, 16 February 2025

Knitting Doll 2024 Part 4

Knitting Doll 2024 Part 4

After that hard Blog here is a nice easy one.

Different Cords


I made the Cords with all the Different Yarns that came with the Kit. They had various differences depending on which Crochet Hook or Grip that I used. (and how many mistakes that I made)

Double Thread


I Threaded Two of the Yarn Ends through a Needle. This made it a Double Thread.

Sew Together


I proceeded to Sew the Two Ends together and Trimmed off the Excess. I have Left the other Ends of the Yarn alone as they will be needed for the next part.

All Five


I have now Sewn all Five of the Cords together. I used the Black as the Centre and Worked outwards from that. I wanted to try and make all the Cords stand out as much as possible particularly on the Two Ends.

Saturday, 8 February 2025

Knitting Doll 2024 Part 3

 Knitting Doll 2024 Part 3

Now for the harder bit - especially to Photograph.

Pull Yarn Taut


The Doll should be facing and have 4 Loops. Take the Yarn Ends and Pull. It needs to be firm but not so Tight as hard to work with or come off.

Warning

From this point the work seems to have a mind of its own and can and does at least in my case try and Unravel itself.

Second Round


We are going to create a Second Round of Loops the same way as before. This has to be done One Loop at a Time not a whole Round. Wind the Yarn around the Hoop above the First Loop. This is important.

Crochet Hook Lower


This is where the Crochet Hook, Grip or Needle comes into Play. With the Doll facing you there are now Two Loops. Take the Crochet Hook and gather the Lower Loop.

Lift Over


Next Lift the Loop Up and Over the First one and remove the Crochet Hook. Gently pull the Yarn and it will Disappear into the Centre. This leave The Loop you have just made now on the Bottom.

I have to confess that I did this countless times before I got it right. I either got the Hook Stuck or pulled too hard and the whole thing Unravelled and I had to start from scratch.

All Four Loops


After successfully Creating and Lifting one Loop off I turned the Doll and started on the next Hoop. I continued this process going around and around. 

Though you cannot see it as it is inside the Doll a Chain or Cord is being formed. I carried on until it came out of the Bottom of the Doll and then a couple of extra inches.

To finish the Cord Rethread the Needle. Go through one of the Loops and Lift off pulling as you do so. Go through all Four of the Loops the Secure it by going through the Top of the Cord.

Saturday, 25 January 2025

Knitting Doll 2024 Part 1

Knitting Doll 2024 Part 1

Hello my lovelies. This time I am going to do some crafting with a Knitting Doll.

Knitting Doll


You can often find cheap Craft Equipment in Local Charity Shops. This Doll came in a Box with instructions for a mere £1.50. I had never used one before so I thought I would give it a go.

Thread Needle


Before I go on I would like to mention that you get various types of Knitting Dolls. This one is a little Boy with Hooks on Top. However you can get Girl Dolls as well as completely bare ones that have Nails rather than Hooks.

This Kit came with a variety of Yarn. I Threaded one of the Colours through a Needle.

Pull Through


Whilst using a Needle isn’t actually necessary it makes this next piece far easier. Taking the Needle and go to the Top of the Doll where the Hooks are placed. There is a Hole in the Centre of the Hooks.

This is a Hollow or Tunnel that runs from Top to Bottom through the Doll. Drop the Needle through until it comes out from the other End. (You can also push the Yarn through with something long but it is more difficult).

Crochet Hooks


There was a part missing from the Kit which had been replaced by a Hair grip. I tried with that and also with the Crochet Hooks. I am going to use the latter as easier to photograph.

Friday, 17 January 2025

Xmas Hang Ups 2024 Part 2

 Xmas Hang Ups 2024 Part 2

Well after the silly mistake I have Restarted with the Correct Needles.

10 Rows


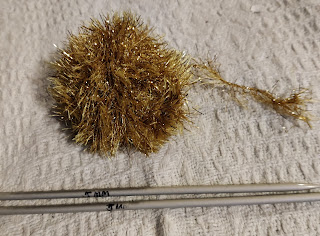
I have now completed roughly 10 Rows and the Cord is beginning to take shape. As you can see in the above photograph it is resembling Tinsel.

Finished Tinsel


I have finished Knitting and Cast Off. The Tinsel is now at least a Yard long or for those that use metric nearly a Metre.

Adding Decorations


I can begin to start Adding the Decorations. Taking one end of the Tinsel I start to Slide the Decoration on. Once in the right place I then make a Knot in the Tinsel. This secures the Decoration where I want it.

I continue Sliding the Decorations on and Knotting in place. I try to spread them out evenly.

Hanging Icicles


Voila. I know have a new Hanging Icicle Decoration for Xmas and it didn’t cost me a penny.


Sunday, 12 January 2025

Xmas Hang Ups 2024 Part 1

 Xmas Hang Ups 2024 Part 1

I have jumped order so that the Xmas stuff is together.

I won some Xmas Decorations from a Charity Raffle. The question was how was I going to put them Up. Then I had an Idea.

Sparkly Yarn


I had some Sparkly Yarn left over from another project. See below for links.

Casts On 3


This is going to be another I-Cord Project. I Cast on 3 Stitches to begin with. Without  turning I continue to Knit. This means the Yarn will be brought forward on every Row.

Restart

I had barely started before I realised that I was using the Wrong Needles! For this kind of Project I need Double Ended Needles and not Circular. 

Even simple Projects can go wrong if you are not paying attention. I will just blame my boyfriend as usual lol I will have to Restart.

Yule and Other

13/04/17

http://lady-jane-quirky.blogspot.co.uk/2017/04/yule-birthday-and-other-projects.html

20/04/2017

http://lady-jane-quirky.blogspot.co.uk/2017/04/yule-birthday-and-other-projects_20.html

Sunday, 5 January 2025

Mini Pudding Puzzle 2024 Part 8

 Mini Pudding Puzzle 2024 Part 8

The final furlong. The end is in sight.

Long Needle


If you remember that far back this Kit came with a Long Needle. Now I get to use it. The Pattern goes a bit into overkill at this point. 

It says take an ordinary Needle with Double Thread, Secure it, Cut at Needle End and change to Long Needle. Push Needle through Pudding and Back again.

Pull Tight


Pull the Thread Tight and it will Flatten the Bottom. I think I Pulled a bit too hard but it worked. I then Secured it at the Topside and Cut the Thread

Stitch Leaves


With the Base Finished I could add the Leaves. I am not sure if they were supposed to be in two pieces or whether they had got ripped. I Sewed the Leaves on using a Backstitch which gave the impression of a Stalk.

Yummy


I added the other Leaf and then Sewed the Berries in place. It is so realistic that all that is missing is the Cream or Custard. Yummy.

Bakewell Museum Link

https://www.oldhousemuseum.org.uk/


Friday, 27 December 2024

Mini Pudding Puzzle 2024 Part 7

 Mini Pudding Puzzle 2024 Part 7

The next Section of the Pattern calls for Ladder or Invisible Stitching. I have never done this before so I had to look it up. I will try to explain as I go along. You might want to read this a couple of times. Or do what I did and google it.

Knot


I am going to show you it along the White part so it can be seen better. First make a Knot. Then put your Needle through the White material.

Stitch Along


In the above photograph it is Showing you the White Section. In fact this the second time I have done this .( I did the knot. Then came across and put Needle through the Brown then returned across to the White)

Push the Needle Along the White Material a short way. Then Crossover and put the Needle through the Brown.

Forming Ladder


I kept repeating the process and as you can see the Thread is forming what looks like the Rungs of a Ladder. I did this until the End.

Difference Between


In the photograph above you can see the Difference Between my normal Blanket Stitch and the Invisible Ladder Stitch. I repeated this process for the other three Seams.

Remove Tacking


With all the Stitching done I could now Remove all the Tacking Stitches. I trimmed any threads that were awkward and wouldn’t come back out.

Bakewell Museum Link

https://www.oldhousemuseum.org.uk/

Sunday, 15 December 2024

Mini Pudding Puzzle 2024 Part 5

 Mini Pudding Puzzle 2024 Part 5

Right with that done I can start the next step.

Creeks


According to the Instructions I now have to start working on something called Creeks. This is Sewing various sections like alleyways together.

Pinning Idea


Since the Sewing needs to be done from the other side I have had an Idea. I will put Pins into the the two Sections opposite in the Pattern. Then when I turn the Material over I will always know where I am.

Start on Creeks


To make life easier for myself now I have turned it over I am going to start Sewing the Creek beside the Pin.

Taking Shape


Having Sewn several of the Creeks I can now see the Ball Shape Taking place.

Two Domes


After I completed the White Section I continued on and Completed all the Brown. I now have Two complete Domes.

Bakewell Museum Link

https://www.oldhousemuseum.org.uk/


Friday, 6 December 2024

Mini Pudding Puzzle 2024 Part 4

 Mini Pudding Puzzle 2024 Part 4

Time to tackle the next part.

Pattern Layout


First of all I have to remind myself of the Pattern Layout. I think that I will start with the easier section.

Match Pattern


I need to get everything back in the right place. I therefore am starting at the Centre Point. This is a Hexagon. I will begin with Adding the Hexagon to the Bottom Left and Sew together using a Blanket Stitch.

Middle Done


I have worked around the Centre Point Hexagon and have Sewn all the Adjacent Pieces to Middle.

Added White


Once I had my Basis I could then Add all the extra White Pieces and Sew them in place.

As Pattern


After all the White was Done I began to Add the Brown Pieces and Sew them in Place. If you look at the above photograph you can see it now matches the Kit Pattern.

Bakewell Museum Link

https://www.oldhousemuseum.org.uk/

Friday, 29 November 2024

Mini Pudding Puzzle 2024 Part 3

Mini Pudding Puzzle 2024 Part 3

With all the White Hexagons Finished I could move on to the Pentagons.

Not Happy


I am really Not Happy with the way this Pentagon has bee cut out. No matter how I turn the Hexiform I cannot get a true match. I am going to have to see if I can try and Fix it during Sewing. I hope the others aren’t like this.

First Pentagon


With what I had to work with I think that this First Pentagon hasn’t turned out too badly. On with the rest.


Speckled Brown


The White is all finished so I can turn my hand to the Brown. Again I am Not Happy. At first glance when I was sorting these out I thought they went near the Top. I thought the Speckled Colour was supposed to be Icing Sugar.

However when I looked through the rest they are all like this. I termed this Speckled Brown - I have been watching a lot of Sherlock Holmes lately.

Add to the Brown


First port of call was to add the Hexiform. Since no thread has been provided I have to search my supplies for some Brown Thread.

Good Colour Match


I am lucky that I have quite a good collection of threads. I have found a Good Colour Match to the Brown Material.

Brown Hexagons


I have finished the Hexagons.

Brown Pentagons


I have Finished the Pentagons. They are not quite the right Shape in places. My fingers were beginning to get sore. I should have rested but that is me all over.

Bakewell Museum Link

https://www.oldhousemuseum.org.uk/