Autumn Cape 2016 A long Term Project Part
1
I have to do this blog in sections due to the nature of the
project. It is a long term project and therefore it needs breaking down. In
2015 I made a cape especially for Pagan Pride. It may be worth referring back
to my blog - Cape for Pagan Pride 2015 to put things into perspective.
I was so pleased with the cape I made that I wanted to make
another one. Instead of being a summer cape in Bamboo Cotton I wanted to make a
woollen cape. As the last cape were summer green colours this new project would
be Autumn colours such as red, orange and gold.
Ok so far. Now I need to try and work out how to do this
blog in some kind of order because as anybody trying to do something creative
knows that ideas don’t always arrive in a logical sense.
Summer Cape
 |
| Copyright Shani Oates |
The above picture showing hooded cape was what I was going
to use as a template. So my first priority was to measure the cape.
Measuring Old Cape

However I wanted the new one to be more elaborate.
Unfortunately I had one of my bright ideas! Why not make my Autumn Cape in the
form of a tree? Enter a lot of hard work. First make a design.
Rough Tree Design Ideas
This was my first rough design. A tree with a hole in
it with the sleeves as branches
Rough Tree Design 1
Now I had my preliminary design I needed some rough
measurements.
New Cape Rough Measurements
However I had a slight problem the last cape had a boxed
pleat in it. If I was going to put a design on the back I couldn’t really have
the pleat. Also I wasn’t entirely sure how many stitches to cast on due to the
fact that the yarn was different to what I used previously. In addition to this
I had never tried to do a coloured pattern before let alone a complicated one
that I was trying to design myself. Time for more thinking, first add
measurements to tree design.
New Cape Measurements
Next add colour to tree picture bit by bit
Adding Colour


I now had a design and some rough measurements. The next
part was trying to turn the design into a pattern. I decided the best way to do
this was to simplify the design and divide into stages. So forget about everything
but the central panel or in other words the tree trunk. In order to get some
idea of concept of gauge, cast on etc. I would make a test piece. This test
piece I would document as I went along. I would be using different yarn and
only doing the top half of the trunk.
Cast On
Looking at the design I divided the colours into groups. I
was using various coloured acrylics on a 5mm needle. I cast on 175 stitches in
total using 9 different balls of yarn.
9 Balls of Yarn
As you can see it is quite a tangled mess but you have to
remember I really hadn’t got the faintest idea what was doing. At this point I
began what was quite a long process of documentation.
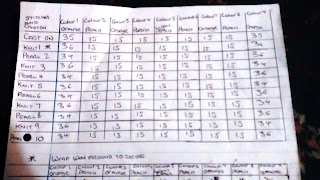
First Written Chart
The above chart shows across the top the number of
stitches which colour used and its order. Since the pattern was symmetrical I
did not bother changing the colour numbers on the reverse as I thought that
would be way too complicated. Besides I had enough to cope with as it was.
Vertically down the chart it showed which numbered row it
was and whether it was a Knit row or a Purl row. After I had knitted a couple
of rows I got the hang of keeping the balls of yarn tidy.
Tidy Yarn
In the picture above you can clearly see the order of
coloured yarn and the way it is beginning to create the top part of the
pattern. I continued knitting and slowly changing the amount of stitches.
Written Chart 2
When I finished row 18 which was a Purl row I recorded the first
major change in the pattern.
Written Chart 3
I continued recording every change and the pattern
eventually covered 5 pages of A 4.
Complete Written Pattern
As I stated previously this was a test piece and I was only
doing part of the trunk. This extended to underneath the hole in the tree trunk
but not down as far as the roots.
Tree


No comments:
Post a Comment