Showing posts with label Part 1. Show all posts

Sunday, 31 May 2026

Dying Dilemma Additional 2026 Part 1

Dying Dilemma Additional 2026 Part 1

I was gifted a Hip Scarf Coin Belt. Unfortunately I Ripped it when taking it off. I need to mend it before using again.

Damaged Hip Scarf


I Damaged the Scarf whilst taking it Off as the Ties were too Short. I will have to deal with that later.

Ripped Off


When I finally got the Scarf undone one of the Gold Coins got Ripped Off.

Missing Gold Coin


Luckily I found the Missing Gold Coin on the Floor.

Need Gold Beads


I am going to need some Gold Beads to Repair the Scarf. I have found 2 but need a third.

Sunday, 26 October 2025

Dying Dilemma 2025 Part 1

Dying Dilemma 2025 Part 1

In the past few months I have been trying to improve my health by starting Belly Dancing. It hasn’t been a great success due to a series of accidents that has prevented me from attending. However I intend to persevere. 

Looks Black


I have a few bits and pieces of Belly Dancing attire that I brought back from holiday. However I need the bigger pieces as well as the accessories. 

Rather than immediately spending a fortune I thought i would see if I could make something. I had a Black Skirt that looks the right sort at the back of the wardrobe.

True Blue


Okay a small problem. Although it looked Black in the bedroom in better light its True Colour is a Dark Blue I needed to change the Colour to match a Top I had.

Dylon Black Dye


With shops like Wilko shutting and the major supermarkets not stocking any I had a real job to find any Dye at all. I finally came across some in a Fabric Shop.

Dylon Instructions


Bad news. Although I have got some Dye it is a Handwash rather than a Machine Dying Kit.

Long Marigolds


One thing I was positive about is that it is going to be extremely messy. Therefore I have taken the sensible approach and bought some Extra Long Marigold Gloves.

Sunday, 5 October 2025

Puffin Pictures 2025 Part 1

 Puffin Pictures 2025 Part 1

Our local Art Shop is closing down due to the gentleman retiring. Let’s put it this way. I bought Fishing Nets from him 40 years ago. Therefore I decided to take advantage of his retirement sale.

Puffin Engraving Art


I have bought an Engraving Art Kit. This is for ages 8 and above for which I definitely qualify. If you ever wonder why I bother blogging Kits it’s so folks have a chance to see what it is going to be like before buying.

Engrave Instructions


The instructions for how to do the Kit are on the back. Needless to say that I have my own way of doing it.

Get a Tray


First of all you will need a Supporting Surface so the Card doesn’t Bend. A Table is best but if like me you don’t have one get a Tray.

Test Piece


Before you start on the Picture it is best to have a go at the Test Piece. They provide you with this so you can try out the Scraper Pen. You will be using both the Sides as well as the Point. I wrote my name using these techniques.

Board


Now you are ready to have a go at the Board. Incidentally this can get a bit messy so a Clothe or Duster is good to have on hand.


Sunday, 17 August 2025

Carnival Calamity 2025 Part 1

Carnival Calamity 2025 Part 1

Every year we have a Carnival in summer. Each year is a different Theme. This year the Theme is Board Games. I thought it would be an excellent time to play Dress Up.

Starting Square


I have quite a bit of Felt left from other projects. I pick a nice large Blue Square to Start with.

30 Centimetres


I take a Ruler and Measure the Length. It comes to 30 Centimetres.

Middle Line


I Measure Half Way to 15 Centimetres and make a mark in Chalk. I Measure the same distance on the Opposite Side and make another mark. I then Draw a Line between the two points. This is my Middle Line.

Centre Column


I have taken a Second Piece of Felt and Pinned the two together with the marked one on top. I then take the Middle Line and place my Ruler directly over it. I then Draw a Line either Side of the Ruler.

Once the Ruler is removed the two Lines have created my first Column. This is the Centre Column that I will be working from.

Nine Columns


Starting from my Centre I move the Ruler either Side to create additional Columns until I have Nine in total.

Grid


I spin the Felt around and then using the same technique add more Lines. This had given me a Grid with Small Squares. I have Nine Columns and Nine Rows in total.

Sunday, 1 June 2025

A Twist In The Tail 2025 Part 1

 A Twist In The Tail 2025 Part 1

Apologies if this blog might be a bit wordy in places. I had such a struggle that I didn’t take as many pictures as normal.

Lots of Balls


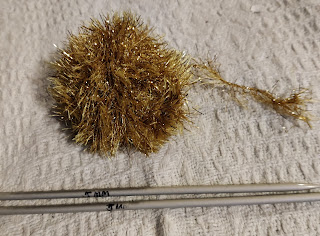
Right. After doing so many projects for myself and others I have ended up with Lots of Balls of Yarn. I say Yarn in this case as although I use Wool for myself I do use Acrylic or Blended for other people.

First of all I sorted all the Yarn into there respective materials. Since I might want the Wool for a project for myself I put that aside.

Adding Grey


I am afraid that I have jumped a great deal here. The Yarn was so tight that I was really struggling to Knit at all. So to Back Peddle naturally the first stop after sorting the Yarn was getting a suitable Knitting Needle.

This was my first problem. I decided that I would Knit in the Round so needed Circular Needles. I had several large Needles but unfortunately these were all accompanied by extremely short Circular Cords. Therefore I had to go down to a Smaller Size. 

I believe the Size I was using was 5 or 5mm. This was better but the Cord was still shorter than what I would like. This was because I was Casting on 201 Stitches. It is an uneven number so I would not lose any Stitches when I joined together.

Six and a Half Cm


I started off with Black Super Chunky Yarn which was left overs from projects where I had made my boyfriend things. See below for details. I Cast On 201 Stitches.

I immediately found that apart from the amount of Stitches on the Needle I was also was having problems with the Yarn itself. It liked to Split and even when Knitted it had lots of Fuzz all over the place.

This made extremely slow progress and the Needles were digging into my Fingers. To my mind it wasn’t so much Knitting as Alligator Wrestling. However I got to the End of the Row and Knitted 2 together to make the Join. After a long while  I finally got to the End of the Black Yarn and started with the Grey. This was the same type and just as difficult.

I decided to measure how far I had got. It was only 6.5 Cm but I decided I was going to start Decreasing anyway. I Decreased roughly every 4th Stitch until I reached 180 left on the Needle.

Argh a Twist in the Tail


I carried on Knitting a few more Rows then held it up to see it properly. To my Horror it was Twisted. One Twist I could cope with but with this I had no chance. The only thing I could do is Undo it all and start again!

Previous blogs

Nott’s County Hat

24/03/2022

https://lady-jane-quirky.blogspot.com/2022/03/notts-county-hat-2022.html

31/03/2022

https://lady-jane-quirky.blogspot.com/2022/03/notts-county-hat-2022-problem-with-pom.html

08/04/2022

https://lady-jane-quirky.blogspot.com/2022/04/the-problem-with-pom-poms-2022-solution.html

Sunday, 23 March 2025

Crawling Creatures 2025 Part 1

 Crawling Creatures 2025 Part 1

Here is a blog about a little gift my boyfriend gave me. Since it is supposed to be from age 5 it should have been simple. How wrong could I be?

Crab Clay Kit


I now have one Air Dry Crab Kit to play with. I have used Air Dry Clay before so it should be easy.

Instructions


I first read the instructions. This is going to be a piece of cake. It will  probably only take me about 10 minutes to finish.

First Booboo


Oops. I dropped the Red Clay whilst taking it out. Hang about this isn’t right. This is NOT like other Clay I have used at all. I thought that I would just dab it on and pick up the Red.

However it doesn’t work. In fact exactly the Opposite. Instead of picking up it sticks to the other Clays. Now I have got Red Clay on all of them.

Red Ball


Rather than carry on trying to sort out the bits that were stuck I put the Lid on the Pot and carried on. Taking nearly all of the Red Clay I rolled it into a ball.

Palm Flattened


I have now Flattened the Ball with my Palm. This will make the Base for my Crab.


Saturday, 25 January 2025

Knitting Doll 2024 Part 1

Knitting Doll 2024 Part 1

Hello my lovelies. This time I am going to do some crafting with a Knitting Doll.

Knitting Doll


You can often find cheap Craft Equipment in Local Charity Shops. This Doll came in a Box with instructions for a mere £1.50. I had never used one before so I thought I would give it a go.

Thread Needle


Before I go on I would like to mention that you get various types of Knitting Dolls. This one is a little Boy with Hooks on Top. However you can get Girl Dolls as well as completely bare ones that have Nails rather than Hooks.

This Kit came with a variety of Yarn. I Threaded one of the Colours through a Needle.

Pull Through


Whilst using a Needle isn’t actually necessary it makes this next piece far easier. Taking the Needle and go to the Top of the Doll where the Hooks are placed. There is a Hole in the Centre of the Hooks.

This is a Hollow or Tunnel that runs from Top to Bottom through the Doll. Drop the Needle through until it comes out from the other End. (You can also push the Yarn through with something long but it is more difficult).

Crochet Hooks


There was a part missing from the Kit which had been replaced by a Hair grip. I tried with that and also with the Crochet Hooks. I am going to use the latter as easier to photograph.

Sunday, 12 January 2025

Xmas Hang Ups 2024 Part 1

 Xmas Hang Ups 2024 Part 1

I have jumped order so that the Xmas stuff is together.

I won some Xmas Decorations from a Charity Raffle. The question was how was I going to put them Up. Then I had an Idea.

Sparkly Yarn


I had some Sparkly Yarn left over from another project. See below for links.

Casts On 3


This is going to be another I-Cord Project. I Cast on 3 Stitches to begin with. Without  turning I continue to Knit. This means the Yarn will be brought forward on every Row.

Restart

I had barely started before I realised that I was using the Wrong Needles! For this kind of Project I need Double Ended Needles and not Circular. 

Even simple Projects can go wrong if you are not paying attention. I will just blame my boyfriend as usual lol I will have to Restart.

Yule and Other

13/04/17

http://lady-jane-quirky.blogspot.co.uk/2017/04/yule-birthday-and-other-projects.html

20/04/2017

http://lady-jane-quirky.blogspot.co.uk/2017/04/yule-birthday-and-other-projects_20.html

Friday, 15 November 2024

Mini Pudding Puzzle 2024 Part 1

 Mini Pudding Puzzle 2024 Part 1

Now for something completely different. I had promised that I would do something from a Kit and here it is.  This Kit was bought from Bakewell Museum. It is a great place to visit and I have attached the website address at the bottom.

Bakewell Museum Kit


I picked this Kit because it was dealing with a modern form of English Paper Piercing. I have never done either so this would be something completely new.

Inside Kit


When I opened the Kit this is what was Inside.  There was the Hexiform (small pieces), the Material (larger) and the Holly and Beads.

Checking Hexiform


When using any type of Kit whether crafting or DIY I always start by checking that I have the right types of Materials and the correct Quantity.

I have checked the Hexiform and it was all good apart from the fact that at this point my Pen decided to break on me.

White Set Layout


I was about to Count all the White Pieces when I had an inspiration. I would do it by laying it out against the Pattern. This killed two birds with one stone.

White and Brown Layout


So far so good. The White was all accounted for so now time to add the Brown to that part of the Pattern.

Brown Layout


Eureka! All the Brown Pieces corresponded to to the Layout.

Both Layouts


In the photograph above you can see Both Layouts side by side. Above the Layouts is the Pattern. You can see a blue sticker. That holds a Needle. Unfortunately there is no thread so I have to go hunting.

Bakewell Museum Link

https://www.oldhousemuseum.org.uk/


Sunday, 6 October 2024

Fan Folly 2024 Part 1

 Fan Folly 2024 Part 1

My mother has lost her Fans so I have offered to have a go at making one.

Lolly Sticks


My idea was to use these Lolly Sticks as the Struts of the Fan. This would mean Drilling through them. You might think this Folly due to the chances of Splitting the Wood.

Garden Labels


Divine Inspiration! Whilst looking for something completely different I found a Garden Label. These already have Holes in them. I searched for the rest of them and gave them a wash.

Screw It


Next was to find something to go through the Holes. I have found a selection of Screws and Nuts. I have matched them up and have a variety of Lengths.

Add Struts


I begin to add the Struts. I am starting with the smallest of the Screws to see how many I can fit on to the Screw.

Thursday, 18 July 2024

Start a Scrunchie 2024 Part 1

 Start a Scrunchie 2024 Part 1

Another go at making a Scrunchie.

18 Inches


Since this is basically another test I am not being too precious about Material that I am using. I am more interested in the Length which is 18 Inches.

Completely Hemmed


I have now Hemmed Completely around the Material. This will of course slightly shorten it. I really should have Pressed the Material first but I could not get to the Iron.

Fold Lengthways


I have Folded the Material Lengthways. I have Blanket Stitched along the open Length. This makes a Tube.

Elastic


Having got to my Iron I have now Pressed the Material. I have selected a piece of Elastic that is roughly the same Length as the Tube.

Many Pins


Naturally every Safety Pin in the house has disappeared so I have had to go shopping. Of course the two sizes that I use most are in different packs so I have ended up buying Many Pins.

Time for a cuppa before I sort this lot out.