Friday, 31 January 2025

Knitting Doll 2024 Part 2

Knitting Doll 2024 Part 2

This is going to be a difficult Blog to write as it is done from the perspective of looking at the Top of the Doll. Try and bear with me. I seriously advise looking at each individual Photograph.

Round Hoop 1


This is the easy bit. First make sure that the Yarn is still out the Bottom of the Doll. It must never be allowed to rise back through so it is advisable to hold it.

Make sure the Dolls Face is towards you. This helps to save getting lost further on. Next take the Yarn from the Top. Wind the Yarn from Left to Right

Round Hoop 2


In order to make life easier for myself I am turning the Doll. The Face now is to my Right. Wind the Yarn around Hoop 2as you did for the First.

Round Hoop 3


Again I have Rotated the Doll. Its is now 180 degrees from where I started. Repeat the Winding process. You should now be able to see Loops forming at the Top.

Round Hoop 4

Unfortunately this Photograph did not come out but the process is the same.

Back to Start


After winding the Yarn around Hoop 4 turn the Doll again and you should be Back to the Start with the Doll smiling at you.

Saturday, 25 January 2025

Knitting Doll 2024 Part 1

Knitting Doll 2024 Part 1

Hello my lovelies. This time I am going to do some crafting with a Knitting Doll.

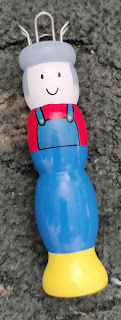
Knitting Doll


You can often find cheap Craft Equipment in Local Charity Shops. This Doll came in a Box with instructions for a mere £1.50. I had never used one before so I thought I would give it a go.

Thread Needle


Before I go on I would like to mention that you get various types of Knitting Dolls. This one is a little Boy with Hooks on Top. However you can get Girl Dolls as well as completely bare ones that have Nails rather than Hooks.

This Kit came with a variety of Yarn. I Threaded one of the Colours through a Needle.

Pull Through


Whilst using a Needle isn’t actually necessary it makes this next piece far easier. Taking the Needle and go to the Top of the Doll where the Hooks are placed. There is a Hole in the Centre of the Hooks.

This is a Hollow or Tunnel that runs from Top to Bottom through the Doll. Drop the Needle through until it comes out from the other End. (You can also push the Yarn through with something long but it is more difficult).

Crochet Hooks


There was a part missing from the Kit which had been replaced by a Hair grip. I tried with that and also with the Crochet Hooks. I am going to use the latter as easier to photograph.

Friday, 17 January 2025

Xmas Hang Ups 2024 Part 2

 Xmas Hang Ups 2024 Part 2

Well after the silly mistake I have Restarted with the Correct Needles.

10 Rows


I have now completed roughly 10 Rows and the Cord is beginning to take shape. As you can see in the above photograph it is resembling Tinsel.

Finished Tinsel


I have finished Knitting and Cast Off. The Tinsel is now at least a Yard long or for those that use metric nearly a Metre.

Adding Decorations


I can begin to start Adding the Decorations. Taking one end of the Tinsel I start to Slide the Decoration on. Once in the right place I then make a Knot in the Tinsel. This secures the Decoration where I want it.

I continue Sliding the Decorations on and Knotting in place. I try to spread them out evenly.

Hanging Icicles


Voila. I know have a new Hanging Icicle Decoration for Xmas and it didn’t cost me a penny.


Sunday, 12 January 2025

Xmas Hang Ups 2024 Part 1

 Xmas Hang Ups 2024 Part 1

I have jumped order so that the Xmas stuff is together.

I won some Xmas Decorations from a Charity Raffle. The question was how was I going to put them Up. Then I had an Idea.

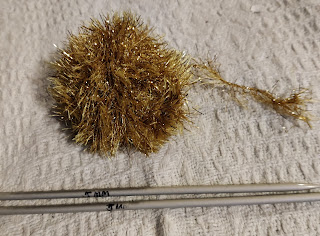
Sparkly Yarn


I had some Sparkly Yarn left over from another project. See below for links.

Casts On 3


This is going to be another I-Cord Project. I Cast on 3 Stitches to begin with. Without  turning I continue to Knit. This means the Yarn will be brought forward on every Row.

Restart

I had barely started before I realised that I was using the Wrong Needles! For this kind of Project I need Double Ended Needles and not Circular. 

Even simple Projects can go wrong if you are not paying attention. I will just blame my boyfriend as usual lol I will have to Restart.

Yule and Other

13/04/17

http://lady-jane-quirky.blogspot.co.uk/2017/04/yule-birthday-and-other-projects.html

20/04/2017

http://lady-jane-quirky.blogspot.co.uk/2017/04/yule-birthday-and-other-projects_20.html

Sunday, 5 January 2025

Mini Pudding Puzzle 2024 Part 8

 Mini Pudding Puzzle 2024 Part 8

The final furlong. The end is in sight.

Long Needle


If you remember that far back this Kit came with a Long Needle. Now I get to use it. The Pattern goes a bit into overkill at this point. 

It says take an ordinary Needle with Double Thread, Secure it, Cut at Needle End and change to Long Needle. Push Needle through Pudding and Back again.

Pull Tight


Pull the Thread Tight and it will Flatten the Bottom. I think I Pulled a bit too hard but it worked. I then Secured it at the Topside and Cut the Thread

Stitch Leaves


With the Base Finished I could add the Leaves. I am not sure if they were supposed to be in two pieces or whether they had got ripped. I Sewed the Leaves on using a Backstitch which gave the impression of a Stalk.

Yummy


I added the other Leaf and then Sewed the Berries in place. It is so realistic that all that is missing is the Cream or Custard. Yummy.

Bakewell Museum Link

https://www.oldhousemuseum.org.uk/