Thursday, 30 September 2021

All Steam Ahead 2021 – Mad Hatter Preparations Part 4

 All Steam Ahead 2021 – Mad Hatter Preparations Part 4

An easy blog this week if a bit wordy.

Add Glue


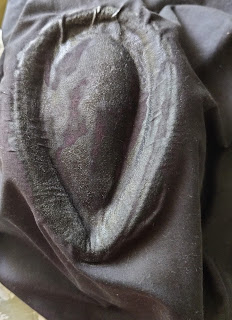
If you remember I said previously that when putting on the base layer a lot of Glue residue had come through. I have managed to cover most of it with the Cogs.

However there was still a considerable amount on the Brim. Therefore I am going to cover it with Ribbon. So I added Glue to the Brim bit by bit.

Cut and Curve


Adding the Ribbon was not as simple as it seems. Straight Lines have a tendency not to like going around Curves. The part of the Ribbon on top of the Brim was Fine but I have to Cut and Curve the Underneath bit by bit.

Add Badge


Now I do have to confess that I did not make the Badge. I’m not that clever! It was something that I got off my friend Laura.

I wanted to change the Shape of the Hat which isn’t an easy thing to do without making a mess of it. I wanted it to look more like a Ladies Riding Hat of Yesteryear. I had the idea of Sewing the Brim to one Side (after Laura had talked me out of both sides saying Steampunk is not symmetrical).

I bent up the Brim, held it and put through a few tacking stitches to hold it in place. I then positioned the Badge and Sewed that in Place. A little bit of Trimming on the Ribbon and it was all done.

Thursday, 23 September 2021

All Steam Ahead 2021 – Mad Hatter Preparations Part 3

 All Steam Ahead 2021 – Mad Hatter Preparations Part 3

This is a nice quick blog. Adding Cogs.

Add Cut out Cogs


I started to Glue the Cut out Cogs to the Hat. I had made quite a few of them now and of different Sizes. For some reason the Base Covering had left a lot of Glue Residue. I wanted to Cover as much of this as possible.

Add Cogs other Side


Once I had added a Bottom Layer of Cogs one Side I turned the Hat around and carried on adding.

Add Metal Centre


The Black Cog Shapes were only the Silhouette. To give them a proper Cog look I Glued a Metal Washer to the Centre of Each Cog Shape.

Front Right


After doing the Bottom Layer I started to fill in the Gaps with more Cogs. 

Front Left


When I was satisfied with one Side I moved on to the other. 

Top Cogs


I had used up all the Cogs I had made so I had to make some more before I could add to the Top. I also had to add a few more to the Back of the Hat.

Thursday, 16 September 2021

All Steam Ahead 2021 – Mad Hatter Preparations Part 2

 All Steam Ahead 2021 – Mad Hatter Preparations Part 2

Since there was a great deal of Preparation I am going to try and get it in some sort of order. Ideally one blog on Preparation and the next one on what I did with it.

Chalk Circles


I started with my usual find something Round and Chalk a Circle around it.

Cut out Circles


I Drew and Cut out 4 Circles to begin with. This is because I needed to work out what I needed to do.

Half Moon


First of all I decided to Fold the Circle into a Half Moon Shape.

Cheese Triangle


I then Folded the Half Moon into what I thought looked rather like the Cheese Triangles you buy in shops. I Snipped off the Corners either side of the Pin at an Angle.

Double Snip


I unfolded the Cheese Triangle and got the Shape above. It was a start.

Middle Snip


I Refolded into the Triangle Shape. This time I Snipped out a Triangle in the Middle. I then opened it up and Refolded along the opposite Fold. Then I Snipped another Triangle out.

(Please note that the pictures may show slightly different stages due to some photographs not coming out properly.)

Original Cog


I had now done all the Snipping out. However I wasn’t entirely happy with it. I decided to try another tack.

Square Cut


This time instead of Snipping at an Angle I made a Square Cut.

Square Snip


I then went on to the next part and Snipped a Square-ish Shape out of the Middle.

Cog Corrections


This time I got what I wanted. A lovely crisp Cog Shape. Looking at the above photograph you can see all the different attempts that it took me to get it Perfect.

Thursday, 9 September 2021

All Steam Ahead 2021 – Mad Hatter Preparations

 All Steam Ahead 2021 – Mad Hatter Preparations

Why do I do these things to myself? The Belt was pretty easy compared to what I have to do next.

Steampunk Hat Base


I had several Ideas regarding how to make the Hat including using card and Foam. However I decided it was far too much to accomplish in the given time just to get the Base.

I therefore went on a Hat Hunting expedition and found what apparently is called a Pork Pie Hat for £1 in a charity shop.

Pool of Glue


Once again I raided Laura’s for both decorations and advice. The latter I promptly ignored. She thought the material was fine as it was saying it looked like leather even though it was plastic she made me laugh by calling it ‘Pleather’.

However I couldn’t abide it as it was so remembering she said that Steampunk was an expression of oneself I decided that I wouldn’t be true to myself if I didn’t cover it. Sorry Laura but you cannot alter a habit of 40 years that easily.

Cotton Cover


So after filling the Top part of the Hat with Glue I covered it with Black Cotton material and smoothed it down. I wanted to keep the Top Shape if I could.

Glue Beneath


It took a while for the Top to dry but once it had I spread the rest of the Hat with Glue. I then Covered it as best I could.

Fold Under


When selecting the material I cut a large piece so there would be enough to Fold Under the Hat.

Beneath Covered


The Front of the Hat was now Covered.

Wrap around


In order to do the Sides of the Hat I had to pull the material taut and do a little bit of Folding. I cut off the Excess and smoothed it down. I now had a fully Covered Hat Base.

Wednesday, 1 September 2021

All Steam Ahead 2021 – Belt Up Part 3

 All Steam Ahead 2021 – Belt Up Part 3

On to the Final Stage of Embellishing the Belt. If you ever want to confuse a Bicycle shopkeeper go and ask them for a Bicycle Chain and then try it on for size.

In Spirit


Another Tip from Lovely Laura of https://www.alyssa-rose.co.uk/ It is not often you want to take Oil off a Bicycle Chain but if you do use White Spirit or Turps. After leaving it overnight then wiping it down with some baby wipes it came out a brilliant Silver Colour.

Superglue Chain


I knew what kind of Pattern I was going for and if you look at the Photograph above you can see that I am placing the Chain Over one Hole and Under the next.

Be careful when using Superglue. Don’t do what I did and Squeeze the tube too hard and end up Gluing your fingers together. It might be worth having some Nail Varnish Remover on standby.

Chain Glued


I carried on Supergluing the Chain along the Belt. I didn’t go right to the end otherwise it wouldn’t have gone through the Buckle.

Copper Wire


Now I can do many things but Reverse the pull of Gravity isn’t one of them. The Belt was now extremely Heavy and I wasn’t sure that the Superglue alone would hold it.

Therefore I pushed Copper Wire through the Holes and Tied around the Chain for extra Strength.

Inner Belt


As you can see from the above photograph the Copper Wire is holding the Chain in place at both the Top and the Bottom.

Steel and Copper Complete


The Belt is now complete. There is even a little bit of the Chain dangling where you can Hook something on. Since the weather is warm I am going to hang a Fan from it.