Thursday, 25 April 2019

More Blooming Flowers 2019


More Blooming Flowers 2019

Now it is Late Spring I am turning my attention to some projects I have put on the back boiler.

New Flower Pattern


I am back to my Embroidery. I have another Cloth to do. If your remember I did some last year * Links at the bottom of the page

All Stems Done


I know I can seem a bit hit and miss in my approach but I do try to be methodical when I can. Therefore I did all the Stems first.

Multi-colour Leaves


After finishing all the Stems I moved on to the Leaves. I am using odd bits of Cotton Silks up. Waste not Want not.

Undefined Leaves


Okay I have hit my first problem. The Transfer was already on the cloth but due to age some of it is barely showing.

Pencil Defined Leaves


The simple solution is to go over the Leaves with an ordinary Pencil. A tedious job but a must especially since I don’t always have good light.

N.B *
List of Flower Blogs

Blooming Flower
19/04/18

26/04/18

24/05/18

14/06/18

27/06/18

12/07/18

20/09/18


Thursday, 18 April 2019

Chaise Longue Renovation Project

Chaise Longue Renovation Project

I have posted about many projects that I have done over the years. I have often encountered problems and written up how I overcame them. Unfortunately not all projects go to plan and this time here is one that failed

Chaise Longue Renovation Project


The project was simple. What I wanted to do was to re-cover my Chaise-Longue.

Cat Attack


The first step was to sand down the legs. I could then paint or varnish them.


First Step


The first step was to sand down the legs. I could then paint or varnish them.

One coat Varnish


Disaster!
It was only when I started sanding that I realised that what I thought were wooden legs were in fact made of plastic. I had no choice but to continue sanding the other legs then varnish.

Long Curtain


I had already got my material. I was using the same material as I had used for my renovation of the Box Seats: -See below for links

Second Curtain


After I laid the first Long Curtain down I proceeded to put the shorter Curtain over to cover the rest of the Chaise Longue.

Unfortunately I have yet to work out a good way of making the material fit so here is a Project that hasn’t gone to plan.

Apologies for layout. not sure what has happened.

Box Seats
17/08/17
24/08/17
30/08 17
07/09/17


Thursday, 11 April 2019

Postcard Portrait 2019


Postcard Portrait 2019

I was given a Photograph Frame as a present. However I couldn’t find anything suitable to put into it. However I then had an idea.

I was browsing around a Book Shop in Nottingham (https://fiveleavesbookshop.co.uk/) when I spotted some Postcards. Why not put inspirational quotes into the Frame instead.

Waste Not Want Not


I got the cards and the Frame but now I had to give them a backing. I had some Cream Paper but I had run out of Sellotape. Solution – Christmas Labels cut up and used instead.

Cream Backing


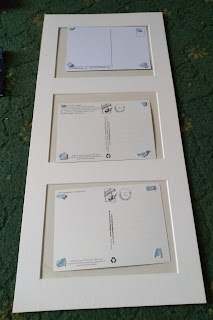
One thing I had to be careful about was the overlap. If you look at the initial photograph you will see that one piece of paper is longer than the other. This is to make sure that the overlap is hidden behind the Border.

Blue Tack Cards


Put tiny pieces of Blue tack on to the Postcards in the corners. They need to be small so the Glass fits on top properly.

Blue Tack Border


To stick the Border in place use small pieces of Blue Tack evenly around the Edge.  I am using Blue Tack so I can easily peel off and move if I need to do so. Do not press into place yet.

Polish Glass


This is the thing that people tend to forget to do. The Glass needs to be polished ‘Prior’ to fitting.

Border, Cards and Glass


I put everything together to double check that it was placed correctly. I carefully turned everything around to see what it would look like with the Glass in front of the Postcards.

Photograph Frame in Place


Here it is nicely Framed and hung. I have placed the cards in this particular order for a reason. The Coloured Postcard draws in the eye. The Postcard at the top has larger writing and the ‘Inspirational Quote’ is simpler.

The Final Postcard is busier and has the smallest writing therefore it is at the bottom as it is most difficult to read.

Thursday, 4 April 2019

Mademoiselle Marionette 2018 Part 25


Mademoiselle Marionette 2018 Part 25

This is the Final Blog on this project. Unfortunately some photographs appear to have gone astray. However I am sure you can follow it without them.

Paper Mache Hook


I went through the process of making the Sticks suitable for stringing by adding Hooks. If you go through the other side a little bit as in the above photograph it can be easily rectified.

All you need to do is to get a few pieces of Paper and some Glue and go over it until it is safe. Then simply colour when dry and continue with other Hooks

Crossed Sticks


Unfortunately this is where some of the photographs I took are a bit allusive. I think though you can see where the Hooks were placed. Find the Middle of the Stick and Mark it. That is where you will Bind it.

Half way between this point and the end of the Stick make another Mark. This is where you will put your Hook. Do likewise on the other side of the Centre Mark.

Left Stick


Adding the Strings is the easy part. Putting them in the right place isn’t. When you start turning the Sticks it becomes difficult to remember which part was the first one. I had an idea.

The first time I gave the ends Numbers which worked so far but it was when you had to join the Strings to the Marionette it got confusing. Therefore I changed from numbers to Letters. In the photograph above the end shows L L – this stands for Left Leg.

Right Stick


Here in this photograph is R L – This stands for Right Leg. Obviously this system depends on how many Strings you are using. There are many different types of Marionettes with variations in number of Strings. Unfortunately the diagram I was using seems to have disappeared into the ether.

If you scroll down to the bottom of the page you will find Links *. There is a good simple String method similar to what I used in the Storm the Castle Link. Now is time for a Photo Shoot.

Lady in Red


Would you credit it? After all that palaver getting the Strings on correctly they have had to be taken off again! Unfortunately she seems to have been too tempting a target for Merlin the Dog.

It is no wonder Mademoiselle Marionette looks worn out. To add insult to injury one of her earrings has gone astray.

Radiant in Red


If you look carefully the little Minx is flashing a bit of Garter to the Boys.

Blue with a Party Twist


Looks like she is rushing from her day job to a night out. At least this time she has both earrings.

Party Girl Blue


Here she is all ready to party the night away. What Ho! Is that the errant earring I spy?

Pure White Lady


So Pure and White. Going to a Christening?

White Lady with a Party Twist


Mademoiselle Marionette. Elle trés chic! Où allez-vous?

C’est Fini.

Links *


N.B
I admit I had to check my French with the translator. I got the words right but in the wrong order.