Thursday, 25 June 2020

A Comfy Candy Christmas 2019 Part 3

A Comfy Candy Christmas 2019 Part 3


The Glue has dried and I can now continue

Warning


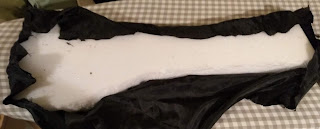
I Unpin the material now the Glue has set. Warning! Don’t be an idiot like I was. When I lifted the Foam I found because I had laid it on the board to dry Glue down it had gone through. I was very fortunate that I didn’t stick it to the board itself.

Check your Pins


Continuing with doing things wrong check your Pins. Black Pins don’t tend to show up very well on Black material. Incidentally I don’t think I mentioned it but I spread the Glue using an old hair remover spreader.

Ensure Pin Edge


For the next part I pulled the Edges as tight as I could prior to Pinning.

Snip and Glue


As I am working around a Curve I had to Snip the material in order to pull it tight. Once it had dried I simply trimmed off the excess.

Overlap Pin and Glue


The final task is to Fold, Glue and Pin the Overlap.

Thursday, 18 June 2020

A Comfy Candy Christmas 2019 Part 2

A Comfy Candy Christmas 2019 Part 2

The next part of the process after Trimming and Shaping the Foam is the Covering.

Found Black Material


I have found some Black Material which I think is long and wide enough to cover the Lolly Pop

Pinned Wrong Side


That is a good start. I was getting to my last Pin and I realised I had the Material upside down. I have had to take all the Pins out again and restart with the Material the right way around.

Pin Material


I Pinned the Material loosely around the Foam on one Side and around the Edges. I want to check if I do have enough Material.

I find that I do but not quite the right shape. This means that I have to adjust the Material when I come to Glue it.

Glue and Pin


I am using simple PVC Glue spread all over one side of the Foam. As you can see in the above photograph the Material has been pulled taut before Pinning.

Glue Drying


Now the Material needs to Dry before I can move on to the next stage.

Thursday, 11 June 2020

A Comfy Candy Christmas 2019 Part 1

A Comfy Candy Christmas 2019 Part 1

This blog deals with another of my bright ideas with a ridiculous time scale. In other words I got an idea for a Yule Present in November whilst I already had projects to finish.

Handy Outlines


First of all let me apologise for the quality of the above photograph. I have tried adjusting with filters and such like and this is the best I can get. Secondly I would like to thank the Major at the Sally Army for being such a good sport and literally lent me a pair of Hands to Draw around.

The reason I didn’t Draw around my own Hand is because it would have been too small and the Arm Length too short as the Present is for a Man.

Rough Cut Foam


I cut out the two pieces of Foam roughly with a Bread Knife. These will form the basis of my project. You might notice a difference between the pieces. This is not a reflection of my male model but a deliberate action on my cutting out.

Lolly Pop


This piece is vaguely Tree Shaped but after some more trimming it will be a Forearm Length Lolly Pop.

Candy Cane


C


This upside down Christmas Stocking is in fact going to be a Candy Cane. However I cannot Curve the Top completely as it will make it too small.

These two Large Christmas Foam items are going to be a pair of Arm Rests

Thursday, 4 June 2020

Face Mask 2020 Part 5

Face Mask 2020 Part 5

If you remember in my last blog I had made a right pigs breakfast of making the Elasticated Mask.  The question is why?

Mum’s Masks


As I mentioned previously I had already made two Masks for my Mum with no problems at all. See above photograph for the Canvas Mask and the Lightweight Mask.

Folded Elastic


I realised that Mum’s Masks were significantly smaller than the one I was now making. Naturally I had shortened the Elastic as a matter of course.

However although I had adjusted for the Longer amount of material what I hadn’t taken into account was the difference in Weight!

Small Fold


This was a major headache. I had starting remaking the Mask. I had already Sewn the Elastic back on itself and had was in the process of making a Smaller Fold. This was to avoid another Merman episode.

The only thing I could do apart from starting from scratch yet again was to hope that in straightening the Mask I had removed enough material to prevent it from sagging as it had before.

Blue Thing


What I had originally intended this blog to be about apart from the use of Elastic was how to make Masks more appealing to Children.

Very young Children might be reluctant to wear Masks. Therefore I thought decorating them with Cartoon Characters would be a possible solution. I started with the ‘Blue Thing’. Any guesses?

Big Clue


I am the first to admit that I am not an artist. However I think the above photograph should be a pretty big clue. All the material that I have used has been Cut, Hemmed and Sewn in the same way as my previous Mask Designs.

Banana


Here you can see the finished Mask. The Minions hands and Goggles have been Embroidered on afterwards. The slant of the Characters is to take into the curvature of the Face.

This Mask is a gift for an upcoming birthday. You can guess by the size that it is actually designed for an adult.  I am quite pleased with the end result. However I have decided that for myself I definitely prefer Ties to Elastic.