Thursday, 28 December 2017

Autumn Cape: A Stitch in Time Saves 9 – Part 2

Autumn Cape: A Stitch in Time Saves 9 – Part 2

If you are wondering if you have missed a blog you haven’t. The 1st Part was written in 2016. I have pasted the link at the end.* It might make more sense if you read that blog first.

With this the last blog of 2017 I thought it would be useful to touch on that sore subject – lack of money. Most people have spent a fortune over the Yuletide and will be cutting back in the New Year. Here is one way you can save money. Repair and modify old items.

Green Cape – Top Holes


The Green Cape I made has not been able to be worn of late as I noticed threads coming away in places. It needed mending – Again!

Green Cape - Middle Holes


Last time I simply did a quick darn with sewing in loose ends where I found them. This time I would have to find a better solution.

Green Cape – Top Centre Flower


In order to strength the whole area around where it is coming away or fraying I decided to do a spot of embroidery. Fortunately I had several balls of yarn of different colours left over from both the Green Cape project and others.

Green Cape – Top Right Flower

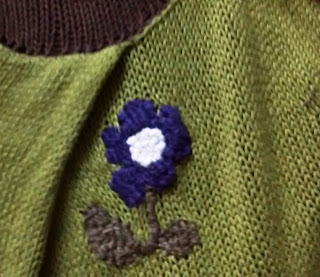
The small holes could be covered by small flowers. However some areas had several holes too close together to do small flowers singularly. Therefore I did a larger flower complete with leaves.

Green Cape – Lower Top Flowers 


The more flowers I embroidered the more holes I seemed to find. In order to spread out the colours I alternated between white, brown and purple flowers.

Green Cape – Middle Back Flowers


Some areas seemed to be fine until closer inspection. This is because the unravelling was showing on the underside rather than the right side.

Green Cape - Bottom Left Flower


This little hole nearly escaped my notice. It was the constant turning whilst embroidering the other flowers that loosened the threads enough to spot. I have more to repair on other parts of the Cape but until I have done that I will move on.

Other Money Saving Ideas
A kind friend - Laura of Alyssa Rose Boutique recently renovating her shop and saved lots of things for me that she thought I might like.(https://www.facebook.com/Alyssa.Rose.Boutique)

Old Chocolate Tin


Chocolate Tins and Tubs are in abundance around Yuletide. This particular one is very old and I had to look it up to find that it was made by Cadbury’s in the 1930’s.

Bead Tin


Inside the Tin was a collection of small bottles. Apparently Laura’s Grandmother used them to put beads in. So who am I to break with tradition?

More Beads 


I sorted all the loose beads I could find and put them into the bottles. I wish I had thought of this idea years ago as it not only gave me more room in my sewing box but I also found more that I had forgotten I had. It was certainly put to good use as I used some of the beads on the Flower Brooches from last week’s blog.

Another Needle Notion


Amongst the items given to me were knitting needles galore. It took me ages to sort them and when I did I found a few odd needles and a couple of broken ones. Rather than throwing them away I decided to use them as supports for my tomato seedlings.

I am still sorting through all the goodies so I may find other items that give me money saving ideas.
*


Thursday, 21 December 2017

Other Bits and Bobs 2017 Part 4

Other Bits and Bobs 2017 Part 4

In Other Bits and Bobs 2017 Part 3 I wrote about the Pink Beret I knitted. This blog covers the rest of the set and a couple of extra items.

Pink Gloves


After the Beret was finished I knitted a pair of Pink matching Gloves.

Pink Scarf


To complete the set I knitted a Scarf. A couple of snags occurred whilst knitting it. If you look at the photograph you can see a bump on the left side. This was a miss-stitch that I didn’t notice until far too late.

Also I inadvertently started a new ball of wool on the last section. It was only later that I found half a ball of wool tucked away in another part of my craft box – very annoying.

This meant when I reached the desired length I had two part balls left. It was this when I had an idea.

Pink Flower Brooch


A couple of years ago I made a top which was fastened with a knitted flower.

I thought this would be a great idea to do in some of the Pink wool I had left. I knitted the flower then proceeded to sew Pink Beads on it.

Brown Flower Brooch


Now the Pink Set was finished I started on another set in Brown Wool. Again I made a Flower Brooch. This time the centre bead was white and the rest were gold.

Back of Brooches


All that was left to do was to sew safety pins on the back.

Brown Beret


I am not exactly sure what I did whilst knitting this Beret but I kept getting the stitch count wrong. Therefore I had to make considerable adjustments whilst knitting in order to get it finished.

Brown Gloves 


Another mistake was made with the Brown Gloves. For some reason one glove is smaller than the other. I have either missed a couple of rows or picked up wrongly. Whatever the case the thumb on one glove is very tight and makes it difficult to move. I am hoping that when washed I might be able to stretch it a bit.

I still have the scarf to do but it will have to wait as I have other projects on the go.


Thursday, 14 December 2017

Autumn Cape 2017 A long Term Project 2017 – Toggles Part 2

Autumn Cape 2017 A long Term Project 2017 – Toggles Part 2

In Part 1 I dealt with fixing the Toggles in place. In this blog I will deal with the other half – The Loops. However before that I have to state that when it came to comparing the two Front Pieces I realised that the Toggles on the Night Time side were way off.

I therefore had to undo three tacked Toggles and place them correctly. After that I had to add two extra Toggles so both sides had an equal amount.

I-Cord for Loop


After I finished sewing the rest of the Toggles on I then began to work on making the I-Cords for the Loops. I used the 2.25mm Double Ended needles and cast on 3 Stitches. I knitted until I reached roughly 14cm.

I-Cord Looped


Once I had the desired length I cast off and using the tail end sewed together to make a Loop.

Pinning Bottom for Loop


In order to make sure I got the Loops matching the Toggles I pinned the bottom of the pieces together.

Marking Place for Loops


Prior to sewing on the Loops I placed the Loop around the Toggle and then marked the place. Once satisfied I sewed the Loop on properly on the selvedge.

Loops Sewn Night Time Side


I continued to sew the rest of the Loops in place on both Front Pieces.

Securing Loops with Hem


The next thing to do was to make the edge look neater and make the Loops extra secure. I did this by folding the edge over and hemming it.

Daytime Loops Back View


The above photograph shows the view of the Loops from the back.

Daytime Loops Front View


As you can see from the front you cannot easily tell that there are any Loops added at all.


Thursday, 7 December 2017

Autumn Cape 2017 A long Term Project 2017 – Toggles Part 1

Autumn Cape 2017 A long Term Project 2017 – Toggles Part 1

I feel quite excited to have reached the point of attaching Toggles. I had originally bought some pewter acorns but when I put them against the garment they just looked wrong. Therefore I decided to buy wooden materials to blend in.

I wasn’t sure what size I needed so I bought small, medium and large. When they arrived it was obvious that the medium size was best. I sorted the Toggles from light to dark. I wanted light ones for the Daytime Front Piece and darker for the Night Time Front Piece.

Autumn Cape Pinned Toggles Daytime


In order to get enough Toggles of the correct colour I ended up buying three packs of the medium size. First using a tape measure I tried spreading out the Toggles along the Side Seam. I marked the sections with pins.

Autumn Cape Tacked Toggles Daytime


My mother suggested tacking the Toggles in place before sewing them on properly.

Autumn Cape Daytime Folded


Once I had tacked the Toggles in place on the Daytime Front piece I folded it over to gauge how it would relate to the Night Time Piece.

Autumn Cape Pinning Toggles Night Time


I used the Daytime Toggles as a guide and put the Night Time Toggles in between and pinned them in place

Autumn Cape Tacked Toggles Night Time


I then proceeded to tack the Toggles as before. I will need to check how it looks before sewing them on properly.