Thursday, 28 November 2019

Dionne’s Draught Excluder 2019 - Part 1


Dionne’s Draught Excluder 2019 - Part 1

I know I have already blogged about making a Draught Excluder before but it was quite a while ago. This has come around as an old fashioned Barter exchange. Ideal for these times of Austerity.

Rough Tube Material


First you need material to make a Tube. This is to make the Body. Before you cut it out make sure that the Length will go across the whole of the Door.

Wrong Side Hemmed


Marvellous. I have just started and already I have make a blunder. I am Hemming the edge of the material and have turned it the Wrong way.

Right Side


The above photograph shows the way it should have been Hemmed. However I will be able to cover it up during overlapping the Tail End.

Blanket Stitch


I have placed the two edges together and Blanket Stitched along the length of the Tube. However I have not Sewn right along to the Ends as I want these to be more flexible.


Thursday, 21 November 2019

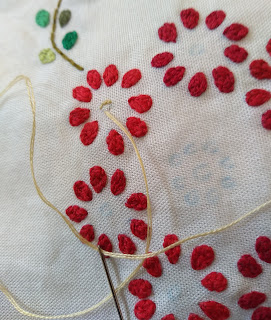
More Blooming Flowers 2019 Part 5

More Blooming Flowers 2019 Part 5

This week’s blog is short and sweet as I am reaching the Finale.

Tiny Yellow Stitches


I am now beginning to start the Stamens. These Stitches have to be very Tiny. I am Backstitching in a Circular Pattern

Finished Yellow Middle


Once I have completed the Circle I have simply added a few extra Stitches over the Middle.

Yellow Ring


Now I have got the hang of the process I continue filling the Middle of all the Outer Blooms.

Fully Completed Yellow Interior 


I have now Fully Completed the Yellow Interior of the Bloom. Needless to say it was both fiddly and laborious.


Thursday, 14 November 2019

More Blooming Flowers 2019 Part 4

More Blooming Flowers 2019 Part 4

It has been awhile since I blogged about this project so here is an update.

Wonky Petal


If I remember correctly I was discussing problems that occur. This problem is one of my own making. Somehow I haven’t correctly followed the outline of the Petal.

Embroidery Mess


This meant that I had to go over the Petal until I readjusted the shape. Consequently as you can see it has made a Mess of the back.

Different Pair of Blooms


Finally I am on to the Large Circular Bloom. If you look at the above photograph you will find Two Pairs of different coloured Blooms.

This is not a mistake. There are two reasons for this. One is I am trying to break up the colour scheme. I do not want the Single Blooms and the Large Blooms the same where they together.

The other reason is I am trying to max out my thread supply. I don’t want to be half way through Bloom and find that I have run out.

Untidy Bloom


A word about Tidiness. Although I have mentioned it before I think in the photograph above you can see properly how bad thread and mistakes make the reverse of the Blooms very knobbly and Untidy.

Tidy Bloom


In this photograph you can see the difference. I was lucky to have much better thread which in turn led to less mistakes and being far Tidier.

Finished Red Petals


I have now finally finished the Red Petals in all the Blooms.


Friday, 8 November 2019

Mademoiselle Marionette Summer Apparel 2019 Part 5

Mademoiselle Marionette Summer Apparel 2019 Part 5

This Handbag Design is far easier.

Sew Strap Light Blue


Making sure that the Zig-Zag material was on the correct line I Sewed a Hemmed Ribbon on one Side.

Pin Strap Edge


I then Pinned this Ribbon between the Edge of the material to make sure I had Folded the other Side it would match.

Ribbon Strap Sewn Both Sides


I then proceeded to Sew the other end of the Ribbon in place.

Pin Top of Bag


In order to stop slippage as I Sewed the Edge I Pinned the Top together.

Blanket Stitch Straps


I used a Blanket Stitch to Sew partial up the Sides incorporating the Ribbon in the Stitches.

Finished Light Blue Bag


I reversed the material and the Light Blue Bag was finished.

Handbag Comparison


Although I said I was making two Handbags I feel with this second Design it is more of a Shopping Bag. I can imagine Mademoiselle Marionette using it to carry some Pain, Vin and Fromage for a Picnic.