Thursday, 25 May 2017

Home Spun Head Scarf 2017 Part 1

Home Spun Head Scarf 2017 Part 1

In a break from the usual blogs regarding my long term project here is something a little different whilst I am waiting for some materials to arrive.

Spun Wool


Quite a while back I mentioned I had done some spinning. Until now I hadn’t actually used the wool. I also had some Fleece that I hadn’t yet spun so I thought I would do a blog about it.

Fleece is shorn off the sheep then washed. After washing it is then combed. You then have raw washed Fleece.

Unspun Fleece


I have a fair amount of the Fleece so I take a medium sized piece to start with.

Teased Fleece


Taking the end of the Fleece I gently begin to pull until I get a thin length I can use. This is referred to as teasing.

Start of Spinning


I slowly twist the thin length of Fleece until I can tie it to the drop spindle.

Fleece Being Spun Anticlockwise


Taking hold of the bottom of the spindle I spin Anticlockwise. This is extremely important and must be spun always in this direction as if you reverse the spin it will simply untwist again.

Spinning and Teasing 


I continued teasing whilst spinning until I had a full spindle. I then gently wound into a ball. I then repeated the process with another piece of Fleece.

Spun Fleece Being Plied


In order to ply the two pieces together tie to the spindle but this time Spin Clockwise.

The Head Scarf Pattern

Using the three balls of wool in the first picture I began to knit a headscarf. I hadn’t got a pattern so I made one up. First of all I had to decide on what size needle to use.

I decided to use a 3.25mm size to keep the stitches small and also in circular needle form for ease.

Pattern
K = Knit
P = Purl
K2tg = Knit two together
Cast on 70 Stitches
Row 1 Knit
Row 2 Purl
Row 3 Knit
Row 4 Purl

Row 5 K10 K2tog K10 K2tog K22 K2tog K10 K2tog K10
Row6 P66
Row 7 K66
Row 8 P66
Row 9 K10 K2tog K10 K2tog K18 K2tog K10 K2tog K10
Row 10 P62
Row 11 K62
Row 12P62
Row 13 K10 K2tog K10 K2tog K14 K2tog K10 K2tog K10
Row14 P58
Row 15 K58
Row 16 P58
Row 17 K10 K2tog K10 K2tog K10 K2tog K10 K2tog K10
Row 18 P54
Row 19 K54
Row 20 P54
Row 21 K10 K2tog K10 K2tog K6 K2tog K10 K2tog K10
Row 22 P50
Row 23 K50
Row 24 P50
Row 25 K10 K2tog K10 K2tog K2 K2tog K10 K2tog K10
Row 26 P46
Row 27 K46
Row 28 P46
Row 29 K8 K2tog K8 K2tog K6 K2tog K8 K2tog K8
Row 30 P42
Row 31 K42
Row 32 P42
Row 33 K8 K2tog K8 K2tog K2 K2tog K8 K2tog K8
Row 34 P38
Row 35 K38
Row 36 P38
Change Wool
Row 37 K6 K2tog K6 K2tog K6 K2tog K6 K2tog K6
Row 38 P34
Row 39 K34
Row 40 P34
Row 41 K4 K2tog K4 K2tog K10 K2tog K4 K2tog K4
Row 42 P30
Row 43 K30
Row 44 P30
Row 45 K4 K2tog K4 K2tog K6 K2tog K4 K2tog K4
Row 46 P26
Row 47 K26
Row 48 P26
Row 49 K4 K2tog K4 K2tog K2 K2tog K4 K2tog K4
Row 50 P22
Row 51 K22
Change Wool
Row 52 P22
Row 53 K2 K2tog K2 K2tog K6 K2tog K2 K2tog K2
Row 54 P18
Row 55 to Row 78 K 18 P18
Row 79 K2 K2tog K10 K2tog K2
Row 80 P16
Row 81 K16
Row 82 P16
Row 83 K2 K2tog K8 K2tog K2
Row 84 P14
Row 85 K14
Row 86 Purl Cast off.

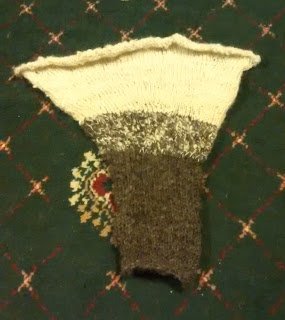
Head Scarf Pre-edging


This part of the Head Scarf is now done. The next blog will be about the edging.


Thursday, 18 May 2017

Autumn Cape 2017 A Long Term Project Night time Pocket Part 1

Autumn Cape 2017 A Long Term Project Night time Pocket Part 1

As with every part on this project it all begins with an idea. After some musing I decided that the pocket would this time have a Mole depicted on it. Therefore I had to try and draw something that resembled a Mole.

Rough Mole Drawing


After several attempts I ended up with this rough sketch. My rule of thumb is if people can tell what it is supposed to be then I am on to a winner.

Rough Mole on Chart Paper


As you can see in the above photo I have transferred the large rough Mole onto chart paper. The Mole at the bottom of the page is a scaled down version. The one at the upper left hand corner is the trying to get the measurements sorted. The one in the upper right hand corner is the final one that has been squared off.

That is the relatively easy bit. Unfortunately if you remember I said that I had made some mistakes when counting and my Badger had wobbly legs. This means that I cannot rely on my chart except as a rough guide. This poses a problem.

Night Time Piece Pre-Pocket


This is the space which I have to work with. I have to work out where to place the pocket. This is going to take a bit of thought. I will let you know how I get on

Thursday, 11 May 2017

Autumn Cape 2017 A Long Term Project Night time Part 3

Autumn Cape 2017 A Long Term Project Night time Part 3


Oh dear. I am afraid that I have not been having much luck with my knitting at present.
Badger Wonky Legs


I am not entirely sure how I have managed it but I have got the Badger’s legs completely out of sync with the pattern. This is going to require some major embroidery to fix.

Badger Hole


Here is disaster number two.  Whilst marking out the shoulder joint with black wool I went wrong. Therefore I needed to undo what I had done. Here I could have really kicked myself. As I cut the wool (I had got it knotted and it wouldn’t unpick) I slipped with the scissors and cut through the knitting.

I swung into major panic mode and quickly grabbed the ends and pulled hard before they could unravel themselves. I then had to gently tease the wool back into shape prior to resewing.

Measuring Before Cast Off


As with the Daytime Front Piece I finished the Pictorial Chart then put against the side to measure. I then sewed the Night Time Piece onto the Side Panel. I sewed down until I reached the end of the yellow and beginning of the brown as shown in the above photograph.

I then kept comparing the section on the needle against the side panel whilst adding a row at a time to the brown.  The final tally was 7 Knit and 7 Pearl Rows plus Cast Off.


Now I have reached the end of this section I will be able to proceed to the adding of the pocket.

Thursday, 4 May 2017

Autumn Cape 2017 A Long Term Project Night Time Part 2

Autumn Cape 2017 A Long Term Project Night Time Part 2
It is difficult to decide what to put in this blog about the Night Time Project. So much of the techniques I have been using have been already blogged about. I don’t want to keep repeating myself and bore people.

Night Time Badger Progress


As you can see knitting the main part of the Badger is far less complex than the Fox so therefore there is not much to say. It won’t be until I start on the legs and belly that it will begin to offer more of a challenge again.

However in order to stop getting fed up in the meantime I have been playing around with a few things. One thing I have been doing is knitting a few leaves. I will need some for the pocket so thought I would crack on and do some.

Size 13 Vintage Needles


Since the last time I knitted some leaves I have purchased some new needles. I obtained an unopened mint set of size 13 double pointed needles. I believe they are 2.25 mm in metric.

Size 13 Needles 11.5 cm Long Leaf


Naturally since these are new needles I didn’t know what length the leaves would come out. Therefore my first leaf was in the mustard yellow wool. It came out at roughly 11 and half cm.

Size 2.75 mm Needles 13cm Long Leaf


I then made a 13 cm leaf with the dark red wool.  Instead of having just four leaves this time I have decided to do five. I thought this would give me a little more flexibility when sewing together.

Selection of Leaves


Next job is to sew in some of the ends so they don’t get tangled.