Tuesday, 19 July 2016

Autumn Cape 2016 A long Term Project Sides Part 2

Autumn Cape 2016 A long Term Project
Sides Part 2

I thought after the last very complicated blog you might like to see a photograph proving that yes the Sides do actually match the Back of the Cape.

Top of Sides and Back of Cape
I am going to attempt something a little different on the armholes from last time on the previous cape. Last time I was using only one colour. This time I am going to be making armholes using two.

On Row 21 on the Pictorial Chart (Row 41 on Written Chart) I knit 12 stitches of one colour then 12 of another. I then Purl back again in the respective colours. I do this for both Side pieces.

Side Pictorial Chart - Start of Armhole
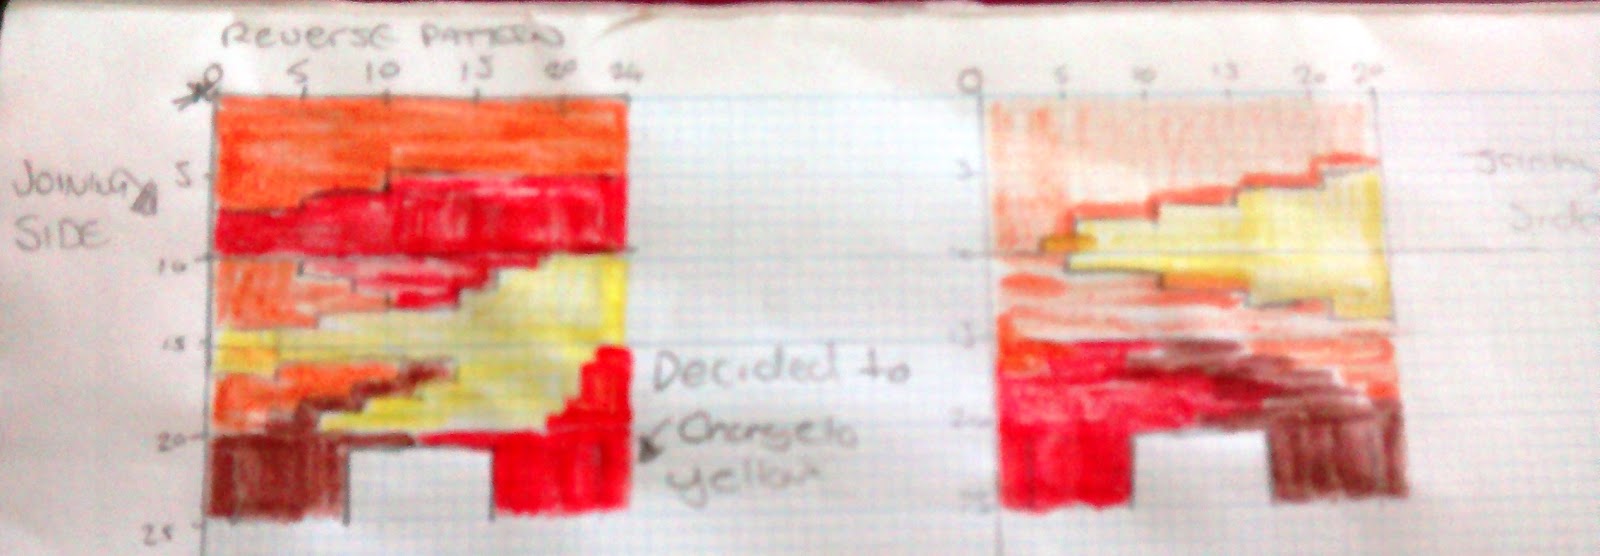


If you look at the above photograph on the Left-hand side you should see Brown, a gap then Red. I decided when knitting to change to Yellow and have marked as shown. The other side is correct.

Now this might get a bit tricky.  I will include the Selvedge in the instructions as we are going to add more. I took the Side piece that is Brown and Yellow and knitted as follows.

The Knit Row
Slip 1 Brown,
Knit 8 Brown, - 9 stitches in total.
Slip 2nd to last knitted Brown over last knitted Brown Stitch to cast off stitch. You should now have 8 Brown Stitches.
Cast off the rest of the Brown Stitches until you have 9 Brown Stitches on Needle and 12 Yellow Stitches.
Knit 1 Yellow Stitch
Slip last Brown stitch over Yellow Stitch.
Continue to Cast off Yellow Stitches until you have 8 Yellow Stitches left on needle.
Knit to end.
At this point you should have on your needle 8 Brown Stitches, a gap then 8 Yellow Stitches.

The Purl Row 
Slip 1 Yellow Stitch
Knit 1 Yellow Stitch
Purl 4 Yellow Stitches
Knit 2 Yellow Stitches
You now have 8 Yellow Stitches with Selvedge at Both Ends

Slip 1 Brown Stitch
Knit 1 Brown Stitch
Purl 4 Brown Stitches
Knit 2 Brown Stitches
You now have 8 Brown Stitches with Selvedge at Both Ends

All 16 Stitches can now be safely slipped on to a Knitting Stitch Holder.

Brown and Yellow Armhole Cast Off


At this point I turned my attention to the other Side Piece and stopped prior to slipping on to a Knitting Stitch Holder.

On Two Needles Close up 


Here I am trying something a little different. Instead of slipping one side onto a Knitting Stitch Holder I am going to use the additional needle from the other side and Knit both sides down at once.

Knitting Both Sides


Knitted down to Casting on 8 Stitches

When I had finished one Side down to where I need to cast on stitches again. I then proceeded to add 4 stitches on each side of the gap thus making a total of 24 stitches again.

I could then Knit straight across and release the other needle ready to use again on the opposite Side. I slipped the first Side on to the Knitting Stitch Holder.

When the other side was level I cast on the 8 missing stitches and knitted across so now both Sides were ready to continue down to the bottom.

I have only vaguely followed the colours of the Pictorial Chart down to this point. I will be making a few embellishments.

End of First Pictorial Chart – Sides Level


In case you are wondering why I am only vaguely following the Pictorial Chart the reason is because it is a guideline not an absolute accurate representation. This is due to making alterations during the knitting for example when I have dropped or made extra stitches.

Whilst following the second Pictorial Chart I tried to keep the Sides roughly the same on the joining section but I began to work in the Green Yarn. I continued this until nearly the bottom then I started working in the Dark Brown again.

Once I reached the point of casting off I stopped and Instead of Casting Off I slipped the stitches onto a Knitting Stitch Holder. The reason for this is I had lost count when knitting the Dark Brown on the Back of the Cape.

Therefore when begin to sew the Sides to the Back of the Cape if I haven’t done enough rows I can just put back onto the needles and add a few extra rows if necessary.

Sides down to the Bottom and on Stitch Holder


Wednesday, 13 July 2016

Autumn Cape 2016 A long Term Project Sides Part 1

Autumn Cape 2016 A long Term Project
Sides Part 1

Before I make a start on the sides I am making a check on the amount of yarn I have since some of the wool is discontinued and therefore I am unable to replenish the stock.

Full Balls Left


2 Copper Balls, 3 Gold Balls, 1 Dark Brown, 1 Mid Brown, 1 Red Berry. The following Green balls 2 Olive, 2 Fern and 2 Bronze Green details are at bottom of page.

Part Balls Left
 

2 Dark Brown 1 Mid Brown, 1 Aran, 1 Gold, 2 Copper, 2 Red Berry, 1 Ginger.

I then checked what colours were at the top of Pictorial Chart 1 that was adjacent to the sides. In both cases the colour was Copper or Orange if you prefer.

I then measured the sides of the previous cape I had made and found them to be roughly 4 inches. I therefore made a test gauge to determine the amount of stitches to cast on.

After a couple of attempts I decided to cast on to 5mm needles 20 stitches plus 2 either end for the Selvedge making 24 stitches in total.

Cast On 24 Stitches


I cast on 24 stitches and knitted 5 rows in stocking stitch just to double check.

Sides Pictorial Chart

I have designed the Pictorial Chart so I can see both sides at once.

Sides Written Chart

I have done the same for the Written Chart.


Both Sides

At this point I am currently knitting the sides simultaneously.

Arrrrrrgggghhh
I have messed up, not sure whether to working whilst tired, not paying attention due to multitasking or just because I am working in reverse.

What I did. This is going to be complicated so here is a reminder of what the 1st Pictorial Chart looks like.

1st Pictorial Chart
Left                                                     Right

So therefore I copied the colours on to a new chart for the sides.

Side Pictorial Chart
Left                                                    Right

What I forgot was the sewing edges would not be in the same place especially as when knitting from the top down. At first glance it looks completely fine. However when reading the pattern I didn’t take into account the position of the yarn.

When knitting you usually have the yarn on the right hand side. Somehow I had managed to reverse this at some point – don’t ask me how?  I think I got confused when adding in a colour and started going backwards!

Anyway I ended up having to unravel it back down to the Orange and start again. This time I drew the Chart how it would be with the Sides attached to the back. Therefore I swapped the two sections around so both patterns joining sides be in the right place.

Reversed Pattern Pictorial
 

Reversed Pattern Pictorial and Written.
 

So to recap looking at 1st Pictorial Chart

Pictorial Chart 1 Representation
Joining Side Left    Joining Side Right

The two black lines represent the approximate colour section I am matching (at least down to the first branches).  Now look at the Reversed Chart below.

Pictorial Sides Chart


Right-hand Side Join         Left-hand Side Join


Here you can see that the sides have now been swapped and are therefore opposite to the Original Chart. If you have problems following this then you will know how I feel trying to work it out!

I think I will leave the blog at this point as the next part will be shaping the sleeve opening.


Green Yarns in Photographs.
Merino Blend DK King Cole 50 g Shade 43 Bronze Green Dye 52153
Merino Blend DK King Cole 50 g Shade 854 Fern Dye 52153

Cygnet Four Ply 50 g Shade 0268 Olive Dye 628030


Friday, 8 July 2016

Autumn Cape 2016 A long Term Project Part 9

Autumn Cape 2016 A long Term Project Part 9

The last time I blogged about the cape I had reached an unnerving point where I had to alter the Owl Pattern part way through. The Owl at present to my mind resembled at best a Pigeon and at worst one of the Gulls that shrieked MINE from Disney’s Finding Nemo!

Original Pattern Owl


The picture above is the Original Pictorial Owl for the back of the Cape.

New Pattern Owl


As you can see I have taken 4 to 5 rows out of the Chart. In reality of course since I am only counting the knit rows of the Pictorial Chart it is 8-10 rows.

Pictorial Shortened Owl Cropped Version


Although it is not a particularly good photograph you should be able to see how it looks fully coloured.

Pictorial Shortened Owl Un-cropped Version


Obviously once I had shortened the Owl on the Pictorial Chart I also had to shorten the hollow surrounding it. Then after knitting to point in the photograph above and was now only using one colour (the dark brown) I simply continued in stocking stitch.

I am not exactly sure how many rows I knitted – as I was in the Pub at the time. However it was at least 10 rows of stocking stitch. If you imagine it is from the shoulders to the knees it is about right.

I did not want to make the back too long for several reasons. Firstly because the Owl is quite near the bottom and since I intended to wear it in Autumn/Winter I don’t want to ruin it by getting it splashed with puddles or mud. Secondly I am not sure how much it will drop when being washed and worn. Last but not least I have not as yet decided whether to add a knitted decorative edging. That will depend on the amount of wool left.


Finished Cape Back Pre Embroidery


Finished Back Embroidered Squirrel


Finished Back Embroidered Owl


Finished Cape Back Post Embroidery


So unless I decided to do some tweaking such as defining the hollow more and adding an edging that is the Back of the Cape FINISHED : )


Thursday, 7 July 2016

Pagan Pride Nottingham August 3rd 2014 Homemade Lammas Costume Part 4

Pagan Pride Nottingham August 3rd 2014
Homemade Lammas Costume
Part 4

This is the final part of making the Lammas Costume. In this Blog I will be concentrating on adding sleeves to the top and lengthening the skirt.

Making the Sleeves
First thing to do when adding sleeves is to measure the armholes of the top so you know the minimum material that is needed.


Next choose your colours for the sleeves I used Yellow, Orange and Red. This is because I made the sleeves in 3 parts. However you can make as few or many parts to the sleeve as you want.


I started with Yellow material but the example in the images is of the second layer (Orange) because it showed up better. First I took a large piece of material. This was already hemmed along the width at one side. If your material isn't then allow extra material (about a thumbs width) for making a hem.


I laid it out flat and measured the length I wanted at the shortest point of the sleeves. This is because I was going to taper it into a point so DON'T cut it out now.

(A close up of the pinning)

Now you have it pinned and made sure you have enough material make a slight mark (I left the end pin in) it is now safe to unpin fold and re-pin.


Next if you have enough pins (if not leave in the first and last pin) mark a diagonal line from one side to the other. You will see that I haven’t gone across straight from the last pin but left an inch for hemming.


When you are happy with the length and angle it is now safe to cut out.


Now unfold the cut out material and put best side down so you can see the inside to hem.


When you have secured the point of the sleeve you can now shorten the width


If you are confident you can cut now and re hem. Alternatively and this is what I did was hem all the way around. I then folded the material back to back. I shortened the width by folding and sewing the material together then trimming the excess.


Now you have your first part of the sleeve.  Pin and Sew onto the OUTSIDE of the arm hole. The point should be at the top.


Repeat the process with the other pieces of material. However sew the other pieces of material on the INSIDE of the last sleeve part.


When you have finished one whole sleeve you can start on the other side.

Completed top design front and back.


Making the Skirt Additions.
Take your skirt and lay it flat this will show the complete width at the bottom.


As you can see my skirt is shaped in points. If your skirt is the same length all the way around then some parts of the Blog will not apply. Choose the coloured material that you want.  I used Red, Orange and Yellow to match the top.

I cut out some triangular shapes in the various colours. Since I needed a variety of sizes I cut out triangles with a mixture of widths and lengths. However this is not necessary with a skirt with a consistent length unless you want to.


After you have cut out your triangles you need to hem them.


Next you can start roughly placing the triangles along the skirt. I put the longest triangles on the shortest point of the skirt. Then I put the shortest triangles on the longest point of the skirt. This way the length was becoming more standard sized.


Once you have a rough idea what it will look like then you can adjust it to your liking. You can either sew straight on to the skirt or alternatively you can overlap the triangles. I did the latter which meant I had to cut out more triangles.

This is what the completed skirt front looks like with Bottom, Poppies and Wheat sheaf added.

This is what the completed back of the skirt looks like with Bottom, Poppies, Wicker-men, Suns, Bales and Sunflower added.


Finally pictures of yours truly in the outfit at Pagan Pride.


Photographs kindly taken by David Hames

Pagan Federation Regional Co-ordinator for Nottingham.