Wednesday, 17 December 2014

Lammas Costume - Basket

Lammas Costume - Basket

This is an add on to the Lammas Costume I made for Pagan Pride 2014. After people in my drama group saw it they decided it was ideal for this years 'The Outrageous Mother Goose Pantomime'.

Since I have a basket to carry I decided to make a cover to go with it. These are the pictures and instructions. Have skimped a little bit at the beginning due to the fact that I only thought about doing a write up until three quarters through.

First of all you need a basket. The shape of the cover will depend on the shape of the basket. Mine is a rectangular shape.

Plain Basket Side View


First of all choose your material. I am using cotton off cuts I saved from the Lammas Costume.

Take a piece large enough in width and length to go over the basket handle. It wants to be fairly sturdy material. It will need to go comfortably over the handle plus enough material to attach to other pieces of material .

Plain Basket View From Above


Make sure you leave enough material to make a good hem. I have decided to use Brown cotton for my base.

Cut out a rectangle in the centre.Check it fits nicely and hem both the cut out section and the edge of the material

Brown Letter Box Shape Over Handle


Once you have done this you should end up with what looks like a Brown hemmed letter box.

This is your starting point for adding the rest of the material. Next you begin adding the rest of the material. I found it easiest to go around the length of the basket first. You can either do this in small sections or as I have done and for each side made long rectangular pieces.

Green Material Attached to Letterbox


I measured from the centre of the length of the basket to the centre of the width of the basket around the outside. I then made 4 lengths of rectangular material (2 for each end) and hemmed them. I then sewed one end to each of the of the centre points of the letter box. Then I sewed the 2 free ends together.Repeat for the other side.
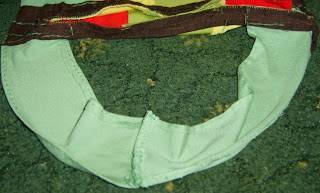

Joined Green Lengths 
Off Basket  


Joined Green 
Lengths On Basket


Once you have added the sections that go around the basket you can start adding the rest of the material to the letter box section.

Selection of Hemmed Squares


The idea is to make a patchwork effect cover though if you wish you could just add one large piece of cloth. I have cut out and hemmed a selection of squares in a variety of colours. 

An example of green squares can be seen here.I pinned and sewed the squares onto the Brown letter box until I had enough to cover the top of the basket.

Pinned Squares

Sewn Squares Reverse View


When you have finished adding all your squares it should look as shown in the pictures below.

With Squares added showing the Basket Opening


Next you have to think about covering the gap in between the two sections of covers.

This I did by cutting a couple of rectangles big enough to bridge the gap and cover the width. I decided to use a darker green to do this so I could easily identify which were the gap covers in a hurry. 

Green Flap


I also chose to use slightly thicker stiffer material so they would not drop down into the basket. Once I had cut out the rectangles I hemmed them. Next was to pin the rectangles into place prior to sewing.


Pinned Flap


 I pinned ONE flap as close as I could to the basket handle without rucking. I ensured that it would bridge the gap comfortably.

The next part is very important otherwise you might have to unpick and start again.Start sewing on the side nearest to the basket handle.


First Sewn Flap


When you have completed that side you can then turn the corner and continue sewing along the length of the flap.Now the third side depends on how far back you placed your flap. 


Second Flap Pinned


Before sewing the third side pin the second flap into place. This is because you want to be able to tuck the second flap under the first to hold it. Once you have pinned the second flap you will be able to tell if you need to sew any part of the third side.

Both Flaps Sewn


If you need to sew any of the third side I suggest that you do a stitch at a time. That way you can keep checking that the second flap fits snugly under the first.

Overlapped Flaps


As you can see in the photograph the flaps interlock nicely. If there is any gap at the side by the handle more squares can be added to cover it.

Hemmed Triangles


In order to match the skirt from the Lammas Costume I cut out some triangles in various colours and sizes.
Hem around the triangles as you did the squares and rectangles.

Then pin them all around the basket.

Pinned Triangles


After pinning the triangles where you want them you can sew them into place.

Sewn Triangles


Now the cover is finished you can turn your attention to the basket handle. That is of course if you wish to do so. As my basket was bought second hand some of the weaving had come loose and was also missing in places.

First remove the cover and start with the plain basket shown below.


Plain Basket


Orange Hemmed Ribbon


Take a long piece of ribbon. I chose an orange coloured piece of ribbon roughly an inch and a half in width. Since ribbon frays quite easily I would hem the ends.

Pinned Ribbon


Wrap one end around the bottom part of the handle and pin it.

Sewn Ribbon Front and Back


Begin winding the ribbon around the handle of the basket. Keep it nice and tight so it doesn't unravel. Keep winding until you reach the other side of the basket. Then either sew, pin or glue the other end of the ribbon.

Fully Wrapped Ribbon


When you have finished wrapping and fixed the end of the ribbon you can replace cover.

Finished Basket

That is the Basket Cover finished and ready for use. However at a later date I may decide to add more triangles and decoration. Hope you enjoyed this blog.

Saturday, 27 September 2014

Tea for Two


On an extremely rare trip out with my mother we ventured to the far flung village of Draycott, Derbyshire. Our original intention was to visit the delightful little gallery 'The Beetroot Tree'. However when we arrived we found that it was closed and apparently for sale.

Therefore I suggested that we take refreshment in a tea shop that I had spotted the previous week when passing through. It was not too far away as it was situated a few hundred yards away from the main Draycott Square on the main road through the village.

We entered 'Victoria Vintage Tea Rooms'' not quite sure what to expect. We found a pleasant and surprisingly spacious interior with another seating section hidden around the corner. The atmosphere was good though it was a little disconcerting having modern music playing when surrounded by the trappings of two centuries ago.

There was a selection of seating arrangements with tables that were nicely spread out with plenty of room. The service was very good as we were attended to quickly but without being pressured.

There were some nice Victorian touches with the menu and the prices were very reasonable. Though my Dr. wouldn't be happy with my choice I couldn't resist sampling the old bygone favourite 'Dripping on Toast'. There was choice of bread and they certainly didn't skimp on the dripping with it being served in an accompanying dish. Next time I hope they have Cucumber Sandwiches on the menu.

They have a selection of tea and since I am suffering from a sore throat I decided to try a Camomile and Honey fruit tea which was extremely soothing and managed to extract nearly three and a half cups out of the teapot. My one regret is we didn't get to sample the delicious array of cakes available though after the calories of the toast and dripping was probably just as well.

The highlight of the visit was definitely the Victorian memorabilia dotted around on show around the tea shop. The most impressive was the two Doll Houses on display where we were sitting. It was lovely seeing all the intricate pieces that fitted into them.

The Tearooms have apparently only been open since June and we shall most certainly patronize the establishment again. I suggest you do the same.

You can find the 'Victoria Vintage Tea Rooms' by following the links below.

https://www.facebook.com/victoriavintagetearooms/timeline

https://www.bing.com/maps/default.aspx?v=2&pc=FACEBK&mid=8100&rtp=adr.~pos.52.894539520085_-1.3417516213173_Victoria+Vintage+Tea+Rooms_25+Victoria+Road%2C+Draycott%2C+Derby&cp=52.894539520085~-1.3417516213173&lvl=16&sty=r&rtop=0~0~0~&mode=D&FORM=FBKPL1&mkt=en-GB


Friday, 19 September 2014

Always something to learn.

The more I learn, the more I learn how little I know. -- Socrates

The more you know, the less you understand. -- Lao-Tzu

A wise old owl lived in an oak
The more he saw the less he spoke
The less he spoke the more he heard.
Why can't we all be like that wise old bird?

These little bits of sayings have come to mind as I have been doing quite a bit of learning lately and not all of it pleasant. I won't dwell on that part as I have just had some good news.

I have always prided myself that language was one of my stronger points especially since people apparently seem to like to read what I write. I must admit though than since I have used the Internet my spelling and grammar has drastically gone down hill. Indeed I wrote a Blog on that some time ago.

23/04/2014


I also have a thirst for knowledge and love to learn new things and at one time I joked that I was a professional student. However due to health problems not to mention a shortage of spondulix I have had a break from studying. A short while ago I spotted an offer for a writing course. Since I need my writing and editing skills brushing up I thought I would sign up.


I am already learning great new stuff and relearning old stuff. After spending lots of time reading the sections of the module and a hell of a deal of note taking (Aargh I almost forgot how much writing with a pen can hurt if you over do it my poor wrist and puddies.) I am pleased to say I have passed the first part and can now move on to the second. Sorry this is such a short blog but I am seriously beginning to lose feeling in my right hand. Well that is apart from the bits that hurt.


Onwards and upwards

Monday, 1 September 2014

Mirror Mirror on the Wall I bet you didn’t like what you saw at all


Well what a very strange month it has been. When I started this experiment I thought I knew who I would have problems with but I was wrong.

The first two weeks were very quiet apart from trouble with neighbour’s visitors. I came very quickly to the opinion that the person I was dealing with was so stupid that he probably had difficulty with an ordinary mirror.

That incident was the tipping point. For the rest of the month I was inundated with complete prats in a variety of flavours.

I am normally reasonably diplomatic so the idea of actually mirroring somebodies behaviour is quite a hard thing to do.  However even I have my limits. So I fought authority with authority and prima donnas with prima donnas. In some ways it was quite refreshing to actually for once give people a taste of their own medicine.
As a society we are taught to be respectful and considerate towards others. However there are occasions when I feel that I am the only person following these cultural parameters


Perhaps I do not hold my ground these days like I used to. Actually reflecting back their attitude to me came as something of a shock. They didn't like what they saw in the Mirror Mirror at all.

Monday, 18 August 2014

Pagan Pride Nottingham August 3rd 2014 Home-made Lammas Costume Part 3

Pagan Pride Nottingham August 3rd 2014

Home-made Lammas Costume Part 3

This is the third part of the Home-made Lammas Costume. Now you know how to make Poppies and Sunflowers I am moving on to Wheat based items. I will start with the simplest.

Making a Hay Bale
Base
Select Yellow material and have the reverse facing you. Take a roll of tape and draw around it making a Circle. Cut out and tack a hem. To make a more secure hem you can go around it with blanket stitch.

The Pattern
Now you have the base you can decorate it. I have gone all around the circle in Chain Stitch to cover up the hemming but this is optional. Find the point you want to start at along the hem. Begin your Chain Stitch and slowly make a continuous circular pattern turning the material as you do so.

As you turn move the Chain Stitch slightly towards the centre. This will give an ever decreasing circular line until you reach the centre. How wide apart you make the lines is up to you.


The next part is not strictly Wheat Based but because of the similarities to the above pattern I have decided to include it at this point.

Making a Sun

Select Yellow material and have the reverse facing you. Take a roll of tape and draw around it making a Circle. Cut out and tack a hem.


Before you fasten off the hem gently pull the cotton through the material at the unsecured end. This will begin to bunch up the material. Spread the material evenly along the shortened cotton. When you are happy with the effect secure the hem.

I have gone around the hem again in blanket stitch to secure the effect. Alternatively you can blanket stitch the hem then make a second tacking hem inside and pull that if you find it easier.

 How to make a Wheat-sheaf.

I have to admit I had a bit of luck when I came to make a Wheat-sheaf. One of the tops I bought to cut up was elasticated across the front. I therefore just cut straight across either side. This automatically pulled it in at the middle. If you cannot get an already elasticated piece of material do not worry. The middle can be pulled in using a tacking stitch as described above.

Select a Yellow piece of elasticated material and cut out the amount you need


You will notice that the bottom half is longer than the top half. This is deliberate as you will see later. Next find the centre of the elasticated part. It might help to mark this spot with a pin. Decide if you want to start at the top or the bottom half of the material section. I found the bottom half easier to begin with as it wasn't so fiddly.

If you want you can use pins to mark the centre of the lower half in a straight line down from your pin in the elasticated section. Choose to work on the bottom left half or bottom right half. I started on the bottom left.

Beginning the Folding
From the centre I began to fold the material in a slightly diagonal direction. This led to a diagonal strip of folded material. You should have more unfolded material at the bottom than the top. I recommend pinning the fold rather than sewing at this point. This allows you to adjust the fold to a different width or angle in you are not happy with it. I certainly had to adjust this several times before I got the effect I wanted.


Continue with this process until you reach the hem at the side. Repeat the folding and pinning process on the bottom right but with the diagonal fold in the opposite direction.

Now once you are happy with size and direction of the folds it is safe to sew. I used a simple tacking stitch which I stopped just short of the edge. You will notice that in the case of the Wheat-sheaf I have not hemmed the bottom edge. This was deliberate to make the folding easier and to give a more rustic effect.

Folding the Top
I repeated the process above for the two top sections. Please note that the top half is folded apparently differently from the bottom. This depends on whether or not you fold the material in place or turn it upside down to fold. The fold still begins in the centre outwards to the edge.

 If you fold in place the direction of the folds will look opposite to the ones below. The simplest way to think of it is a mirror image. Therefore the Top Left hand section will look like the Bottom Right hand. The Top Right will look like the Bottom Left. See below


As you can see in the above picture I have also sewn along the middle of the Wheat-sheaf vertically with a slight overlap to make a tighter and more pronounced sheaf. You can also see that the top half is significantly shorter in length than the bottom half.

Adding the Wheat heads to the Top of the Sheaf
Select some pieces of yellow material to add to the top of the Wheat-sheaf. They all need to be the same width as the folds. I used the rest of the hem from the cut up top.

The length of the material is up to you. It does not have to all be the same length indeed it gives a more realistic appearance if it isn't. Sew the Wheat heads on to the stalks from behind You do not have to put one on each stalk. Every other stalk is fine.


As you can see I have spaced out the Wheat-sheaf heads and accentuated the direction.

 I have also sewn the tips into a triangular shape. This is the basic design of the wheat-sheaf. 

If you feel like adding to it you can do so. I took a long piece of hem and made a bow. This I added to the centre on the Wheat-sheaf to give the impression that it was tied. Once the Wheat-sheaf was sewn in place onto my skirt I added to the Wheat heads. Using a Chain Stitch I added a few stitches either side of the Wheat heads and also on the top of the heads. This completed my Wheat-sheaf


If you take a long piece of hem or yellow material you can make single pieces of wheat. I did this in between the Poppies


Making a Wicker-man
Select a Yellow piece of elasticated material and cut out the amount you need. Again I was fortunate to have some small elasticated material. However due to the shape of the material I had left I did not have quite enough material. Therefore I had to improvise and do it in sections.

Cut out the shape of a man. As stated previously I was short of material so I have cut out of the man minus the arms.
Please note that the material on the right is upside-down. I did have a reason for this at the time but now I cannot remember for the life of me what it was.


Making the Legs
Cut the material up the centre from the bottom to just short of the elasticated part shown.


I have put a hem on both sides just to secure it.


Using the folding technique that was used for the wheat sheaf above begin to fold each leg until they are fully folded.

Making the Head
Trim the upper part until it is roughly head shaped.


Using the folding technique that was used for the wheat sheaf and legs above begin to fold the head from the centre outwards. Sew from the bottom to the top of the material. Leave a small gap at the top. This will allow for more trimming for a better result.


Making the Arms.
Cut out two pieces of material for the arms. Trim the pieces so both arms are slightly angled at the bottom.


Using the above technique fold both pieces of material until both of them are completely folded. Attach an arm to either side of the body. You now have a finished Wicker-man.


In my next Blog I will be showing how to put the sleeves on the top and edging on the skirt.


Monday, 11 August 2014

Pagan Pride Nottingham August 3rd 2014 Home-made Lammas Costume Part 2

Pagan Pride Nottingham August 3rd 2014
Home-made Lammas Costume
Part 2

To continue from my last Blog on making Poppies this Blog will show how I made Sunflowers.

How to Make a Sunflower.


Select your material. You need Brown material for the Base, Green material for the Stem and Orange and Yellow material for the Petals.


Base
Select Brown material and have the reverse facing you. Take a roll of tape and draw around it making a Circle. Cut out and tack a hem. To make a more secure hem you can go around it with blanket stitch.

            Rough cut       Tacked Hem       Secured Hem
Petals
Select Orange or Yellow Material.
Cut into
 rectangles.
Reverse
Front


Next hem all four sides. Fold the material down the length with the front on the outside. Sew along the top edge. Next turn over the material and flatten out so it forms a point. Sew a few stitches in the middle to secure. Repeat with the bottom. 


You will now have a single Petal. Repeat this process until you have enough Petals to go around the Base. Remember to allow for overlapping. If you want a longer thinner Petal cut a longer piece thinner. If you want a stouter Petal you make cut a shorter wider piece of material. 

Stem
Select Green material and have the reverse facing you. Cut a long thin rectangle piece. Hem all around each side. Find the centre then fold the right side to the centre. Then fold the right side to the centre. Then sew up along the centre line.


Leaf
Select Green material and have the reverse facing you. Cut out a leaf shape then hem around. Repeat for the second leaf.


Making up the Sunflower
Now that you have all the pieces you need. Sew the leaves onto the stem. It doesn't matter if you sew them behind the stem or in front of the stem. You can overlap the leaves, have them adjacent or at different positions on the stem. If you are making a very tall flower you may wish to add extra leaves.

Overlap the Sunflower Petals slightly and sew around the circular base. You will get a triangle shape in between the Petals in the centre of the flower.


When you have finished sewing on the Petals to the Sunflower head you can then sew the head and stem together. You now have a finished Sunflower.


This process can be repeated with different coloured Petals and sizes.


Finally add the Sunflowers to your material. 


My next blog will be how to make wheat items.